Justified Image Gallery arranges your images in neat rows that align perfectly without gaps. PowerPack Image Gallery widget lets you create a justified image gallery without adding code!
Follow the steps below to create a gallery that showcases your images beautifully:
Step 1: Drag and Drop the PowerPack Image Gallery Widget#
First, open the page using the Elementor editor where you want to add the image gallery.
From the Elementor widget panel on the left, search for the "image gallery" widget by PowerPack. Drag and drop this widget onto the section where you want your gallery to appear.
Step 2: Choose Images#
After placing the widget:
- Click on the widget area to open the settings panel.
- In the "Content" tab, click on the "Add Images" button. This will open the WordPress media library.
- Select the images you want to include in your gallery and click the "Create a New Gallery" button.
- Arrange the images in your desired order and click the "Insert Gallery" button.
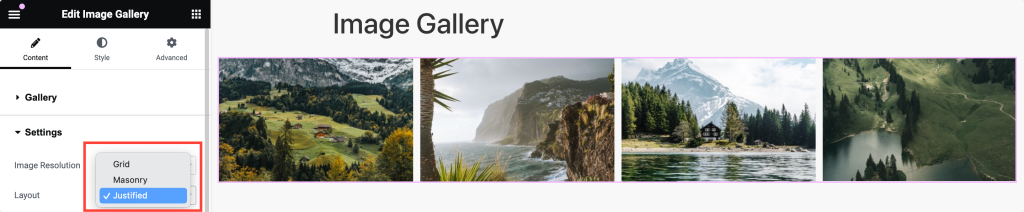
Step 3: Select Justified Layout#
Next, navigate to the Content tab and scroll down to the Settings section. Here, you'll find the "Layouts" option. From the available layouts, select "Justified." This will arrange your images in a justified format, ensuring that all images align perfectly in a row without any gaps.
Step 4: Customize Your Gallery#
Once you have selected the justified layout, you can further customize your gallery using the following options:
Row Height#
Adjust the Row Height to set the height for each row of images. This option allows you to maintain consistency and ensure your gallery looks balanced. You can experiment with different heights to find the one that best suits your design.
Last Row: Justify, No Justify, or Hide#
You can control the appearance of the last row of images using the Last Row option. You have three choices:
- Justify: This option will stretch the images in the last row to fill the entire gallery width, ensuring that all rows are evenly justified.
- No Justify: This option will keep the original aspect ratio of the images in the last row without stretching them.
- Hide: This option will hide images that don't fit into a full row, keeping the gallery clean and uniform.
After customizing the justified image gallery to your liking, you can add captions, links, and other styling options available in the widget settings. Preview your gallery to ensure everything looks perfect, then save your changes.
Following these simple steps, you can create a justified image gallery using the PowerPack Image Gallery Widget for Elementor. Hope this helps!