PowerPack Timeline widget for Elementor allows you to easily add interactive timelines to your WordPress website. With this widget, you can create both horizontal and vertical timelines.
In this guide, we'll explain how to create a horizontal timeline and discuss all the available options.
What is a Horizontal Timeline?#
Horizontal Timeline is a way to display milestones, events, or any achievements in order. Instead of stacking them one on top of the other, they are placed side by side in a straight line. Each event usually has a card or marker with a title, date, and other details.
This type of timeline is great when you have a few key events and want them to spread across the page from left to right. It works well for things like project milestones, product launches, e-commerce product showcases, or any sequence that looks better when displayed in a straight, horizontal layout.

How to Create a Horizontal Timeline in Elementor Using the PowerPack Addons#
Steps to Create a Horizontal Timeline:#
- Drag and drop the Timeline widget onto your Elementor page.
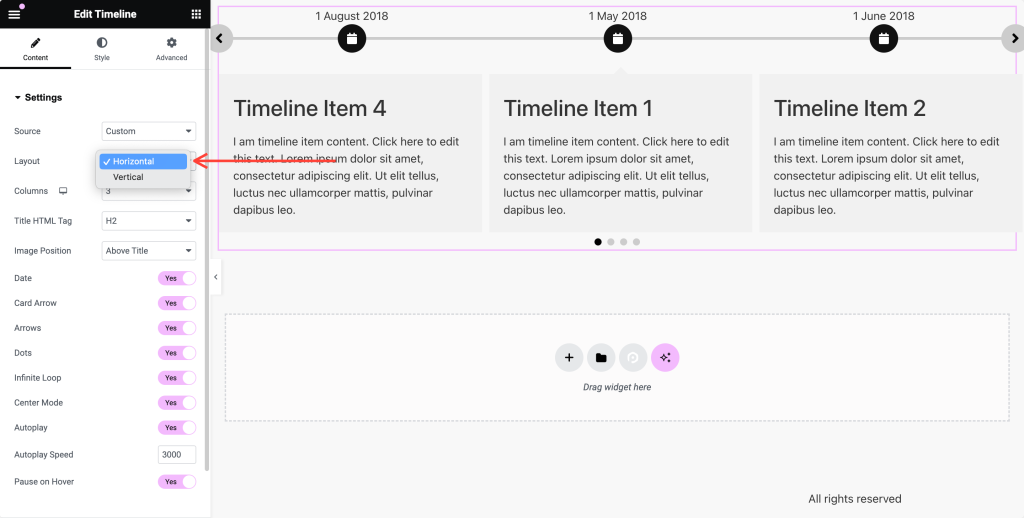
- In the Content tab, under Settings, select Horizontal from the Layout option.
- In the Columns field, choose how many columns you want the timeline cards to be displayed in.
- Use the Cards to Scroll field to decide how many timeline cards should scroll per swipe.
- Use the Title HTML Tag dropdown to choose the appropriate HTML tag for your timeline title.
- Under the Image Position field, select whether the image should appear Above Title or Below Title.
- Toggle on the Date option to display the date on your timeline cards.
- Enable the Card Arrow toggle to show arrows on each card.
- Toggle on Arrows to display navigation arrows for the timeline slider.
- Toggle on Dots to display pagination dots below the timeline slider.
- Toggle on Infinite Loop to enable continuous looping of the timeline slides.
- Enable Center Mode to highlight the center item when swiping. This feature works only when Infinite Loop is enabled.
- Toggle on Autoplay to automatically cycle through the timeline slides.
- Adjust the Autoplay Speed field to set how fast the slides transition.
- Toggle on Pause on Hover to pause autoplay when the user hovers over the timeline.

Additional Styling Options:#
You can further customize the look of your horizontal timeline using the various styling options available within the widget. For more details on these options, check out our complete Timeline Widget Overview.
We hope this guide helps you create a beautiful and interactive horizontal timeline for your Elementor website!