PowerPack Marquee widget lets you create a smooth scrolling effect on your Elementor website. You can use it to display moving text, images, logos, announcements, or promotional content across the screen.
This type of scrolling effect is commonly used on news websites, sale banners, and highlight sections.
Getting Started: Using the Marquee Widget#
Follow these steps to add the Marquee Widget to your page:
- Open the page where you want to add the marquee in the Elementor editor.
- In the widgets panel, search for “Marquee”.
- Drag and drop the Marquee Widget onto your page.
- Make sure to check "PP" icon on the widget.
- Once added, you’ll see two main tabs in the left panel:
- Content Tab: Controls how the marquee works and what content is displayed.
- Style Tab: Controls the appearance and design of the marquee
Let’s go through each setting in detail.
Content Tab of the Marquee Widget#
Content Tab of the PowerPack Marquee Widget for Elementor includes 4 sub-tabs:
- Marquee
- Query (available when Posts is selected as the Source)
- Separator
- Settings
Let’s explore each section in detail.
Marquee#
The Marquee section lets you choose what content will appear inside the scrolling marquee.
Source#
This option lets you select where the marquee content comes from. You can choose between: Custom or Posts.
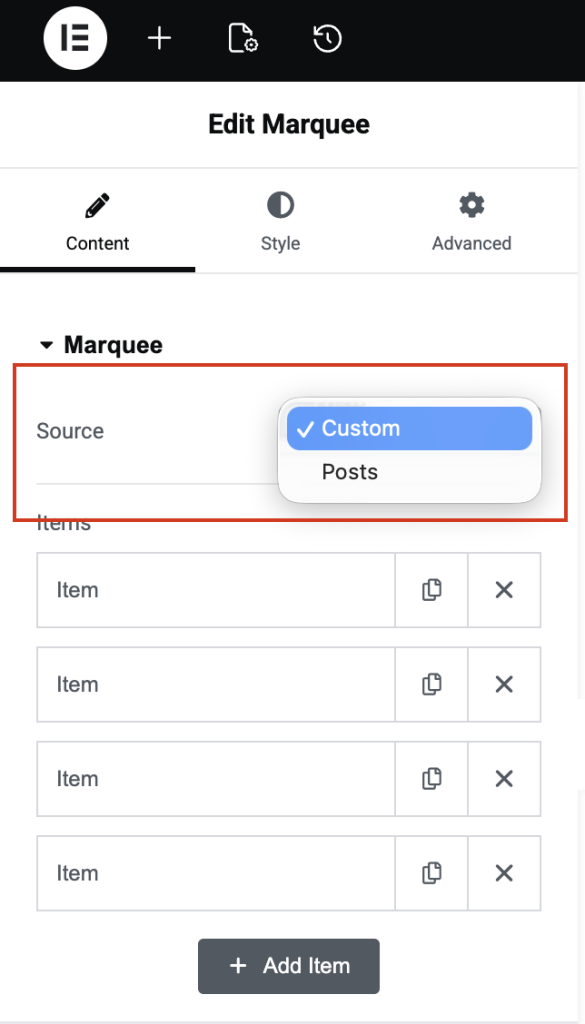
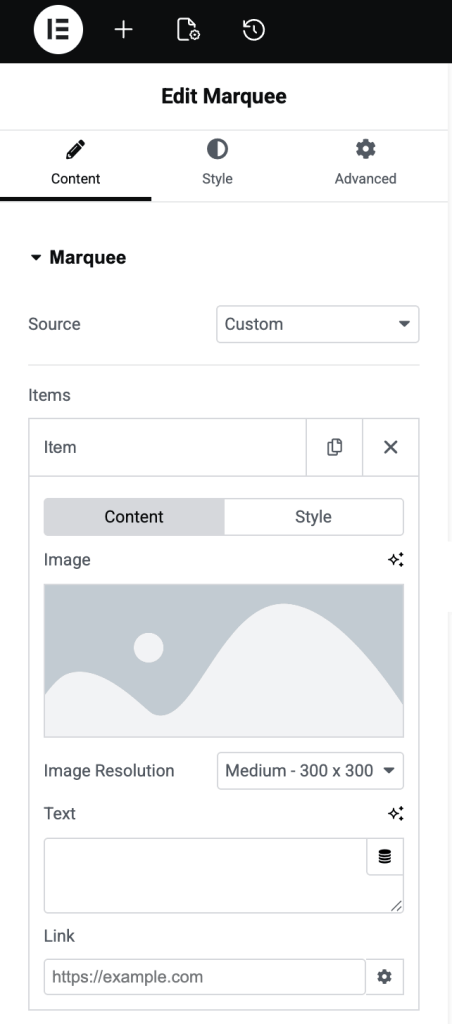
Custom Source#
When you select Custom, you can manually add your own marquee content.
You can:
- Add custom text for each marquee item.
- Add a link to make the content clickable.
- Create multiple marquee items as needed.
- Style each item individually
You also get styling options such as:
- Text Color: Changes the text color.
- Text Hover Color: Changes the text color when hovered.
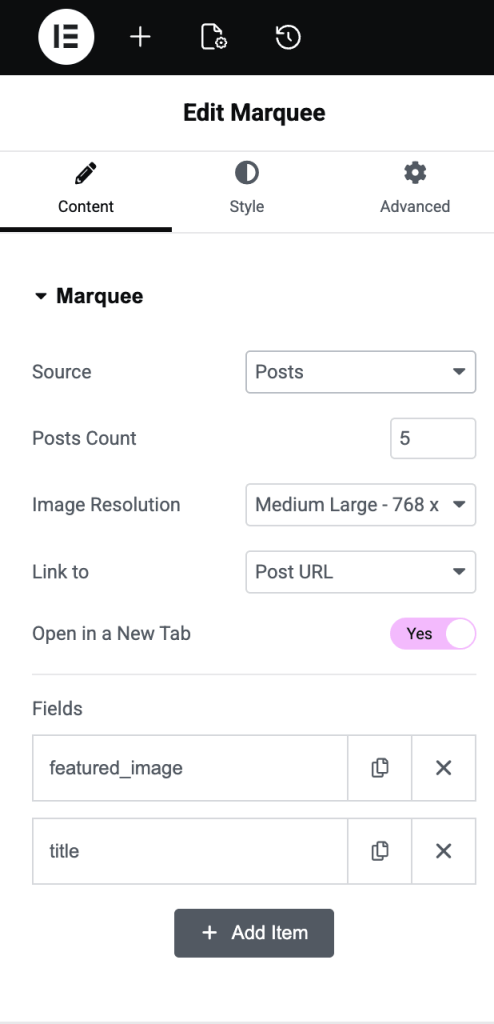
Posts Source#
When you select Posts, the marquee automatically pulls content from your WordPress posts.
You can control:
- Posts Count: Choose how many posts appear in the marquee
- Link to: Link directly to the post or use a custom link
- Open in New Tab: Open the link in a new browser tab.
You can also choose which post details to display using the Fields section.
- Featured Image: Displays the post thumbnail
- Title: Shows the post title.
- Date: Displays the publish date
- Author: Shows the post author's name.
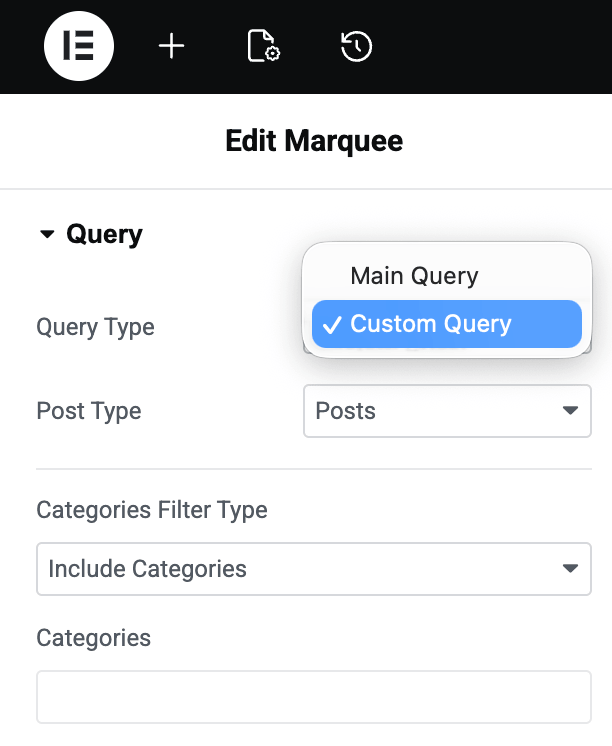
Query#
The Query section becomes available when you select Posts as the Source in the Marquee tab. It lets you control which content appears in the marquee.
Query Type#
From the Query Type section you can choose how content should be pulled into the marquee.
Available options:
- Custom Query: Manually control which content appears using filters and settings.
- Main Query: Uses the default query from the current page or archive.
Custom Query#
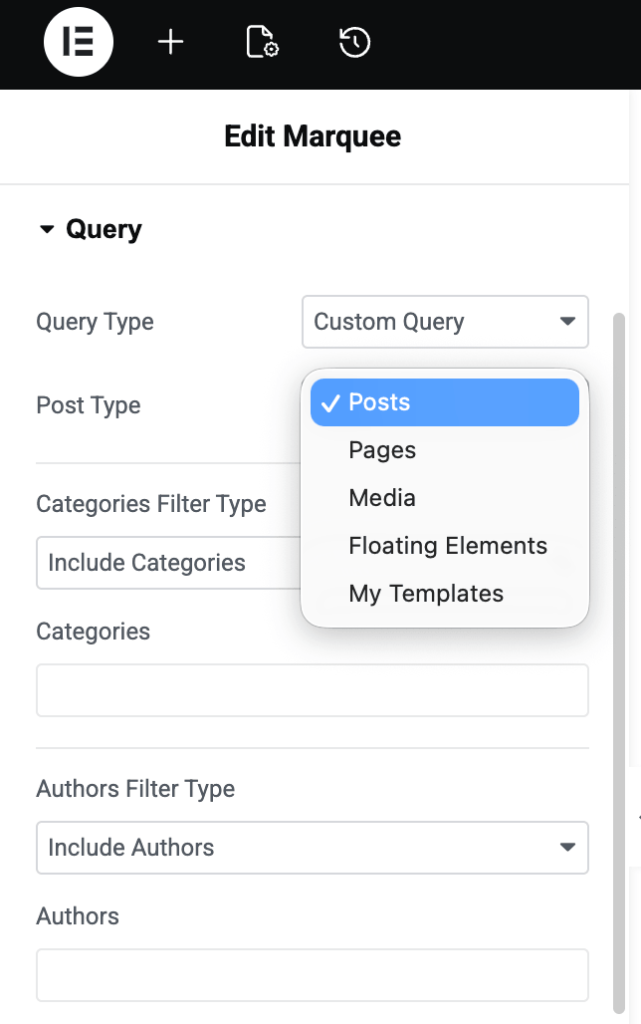
When you select Custom Query, you can choose a Post Type to define what content should appear in the marquee.
Available Post Types include:
- Posts
- Pages
- Media
- Floating Elements
- My Templates
Each Post Type includes its own filtering options.
Post Type: Posts#
Select Posts when you want to display blog posts inside the marquee. You get the following query options:
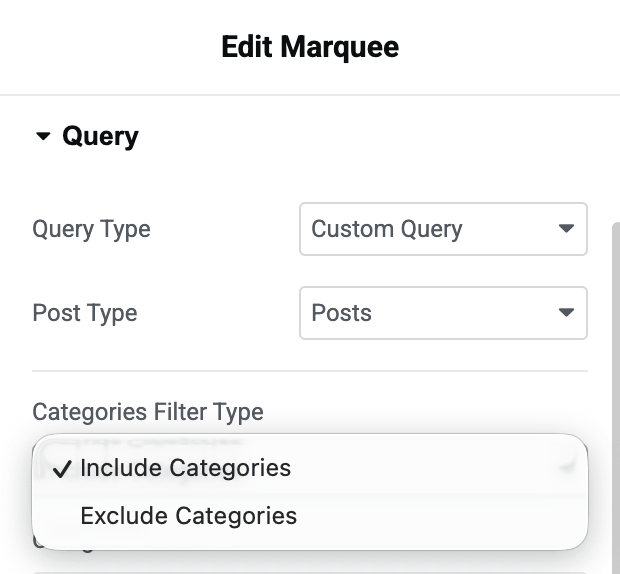
Categories Filter Type
Choose whether to:
- Include Categories: Show posts only from selected categories.
- Exclude Categories: Hide posts from selected categories.
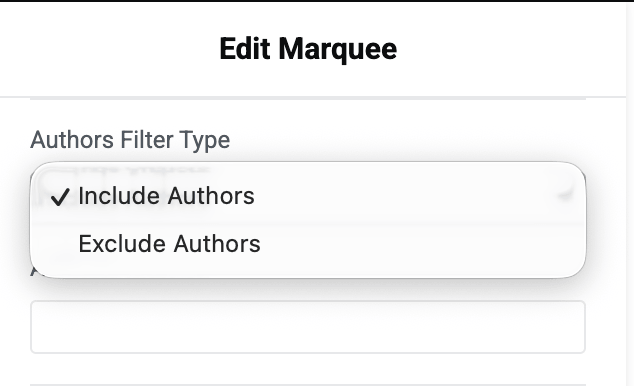
Author Filter Type
Control posts by author.
- Include Authors: Show posts from selected authors.
- Exclude Authors: Hide posts from selected authors.
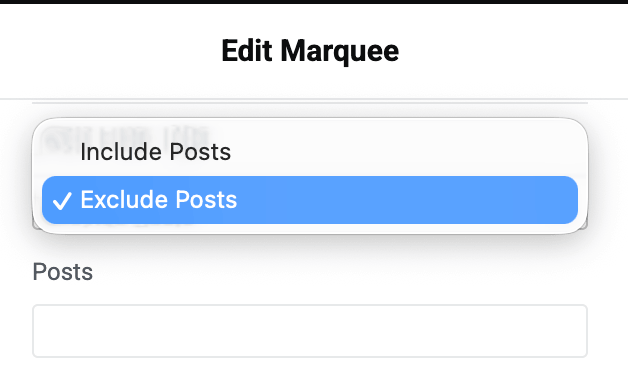
Posts Filter Type
Select specific posts to include or exclude.
- Include Posts: Display only selected posts.
- Exclude Posts: Hide selected posts.
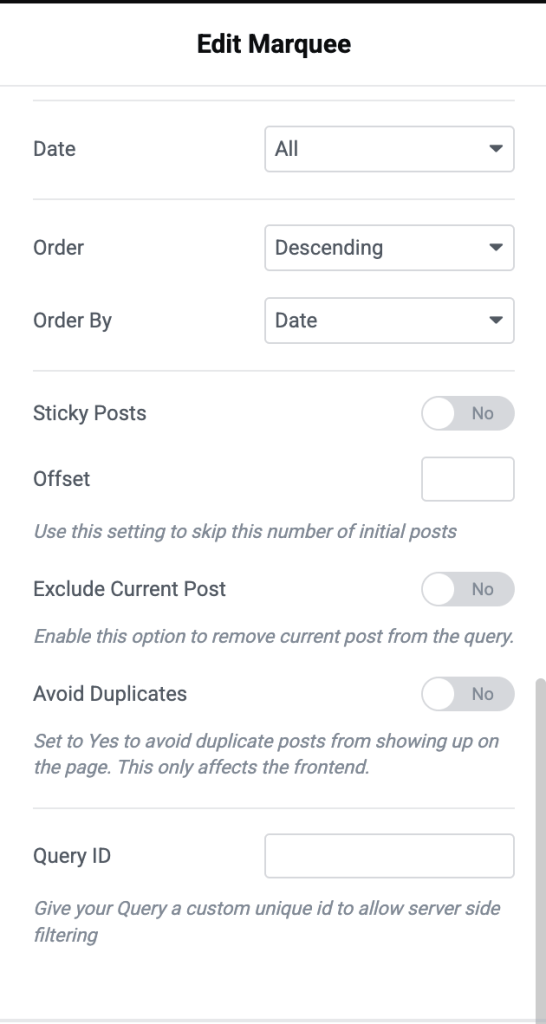
Order
Choose how posts should appear.
- Descending: Shows newest items first.
- Ascending: Shows the oldest items first.
Order By
Choose how posts should be sorted. Common options include:
- Date
- Last Modified Date
- Random
- Comment Count
And more!
- Sticky Posts: Enable this option to have sticky posts appear in the query.
- Offset: Use this option to skip a specific number of posts from the beginning. For example, entering 2 skips the first two posts.
- Exclude Current Post: Enable this option to remove the currently open post from appearing inside the marquee.
- Avoid Duplicates: Enable this option to prevent duplicate posts from appearing on the same page.
- Query ID: Add a custom Query ID to allow advanced filtering or server-side query customization.
Most Post Types include similar query options. The screenshots below will help you understand the available settings for each Post Type.
Separator#
The Separator section lets you add a divider between marquee items. This helps create clear spacing and improves the visual appearance of the scrolling content.
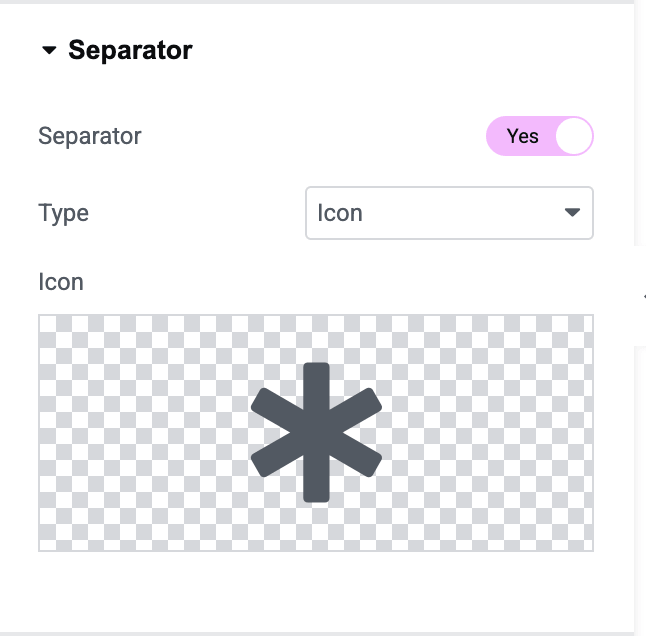
- Separator: Enable this option to display a separator between each marquee item. This is useful when you want to visually separate text, images, logos, or post content inside the marquee.
- Type: Choose the type of separator you want to display. Available options include:
- Icon: Adds an icon between marquee items.
- Text: Displays custom text as a separator.
- Image: Uses an image as the separator.
Settings#
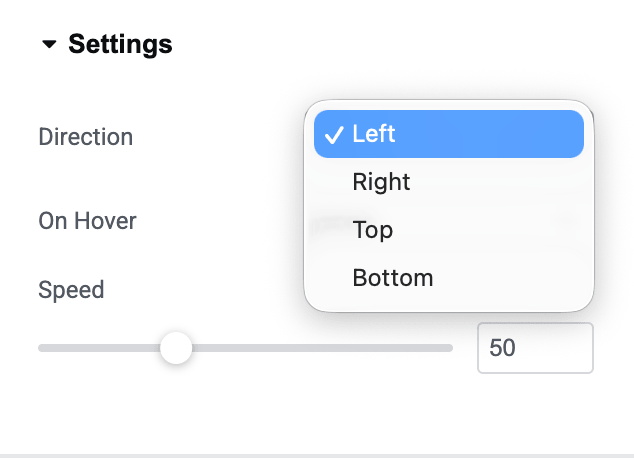
The Settings section lets you control how the marquee animation behaves on your page.
- Direction: Choose the direction in which the marquee content moves. Available options include: Left, Right, Top and Bottom.
Style Tab of the Marquee Widget#
Style Tab of the PowerPack Marquee Widget for Elementor lets you control the marquee's overall appearance. It includes five sub-tabs:
- Layout
- Items
- Text
- Image
- Separator
Layout#
The Layout section controls the overall structure and spacing of the marquee items.
- Fields Layout: Choose how the content inside each marquee item should be arranged.
- Fields Gap: Adjust the spacing between the fields inside a single marquee item.
- Items Gap: Control the spacing between each marquee item.
- Rotation: Rotate the marquee items to create a unique visual effect.
Items#
The Items section lets you style the appearance of each marquee item. You can control spacing, background styling, borders, and hover effects.
- Padding: Adjust the inner spacing inside each marquee item. You can add padding to the: Top, Bottom, Right or Left.
- Normal & Hover States: You can style marquee items separately for:
- Normal: Default appearance of the item
- Hover: Appearance when a visitor hovers over the item.
- Background Type: Choose a background style for marquee items.
- Border Type: Add a border around marquee items.
- Border Radius: Control the roundness of item corners.
- Box Shadow: Add shadow around marquee items to create depth and highlight the content.
Text#
The Text section lets you control the appearance of text inside the marquee items. You can customize typography, colors, and text effects.
- Typography: Adjust the text styling to match your website design. Typography settings typically include: Font Family, Font Size, Font Weight, Line Height and more.
- Text Color: Choose the color of the text displayed inside the marquee.
- Text Shadow: Add a shadow effect behind the text.
- Text Stroke: Add an outline around the text.
Image#
The Image section lets you style images used inside the marquee. This section is useful when your marquee content includes logos, featured images, or custom images.
- Image Size: Adjust the size of the images displayed inside the marquee.
- CSS Filters: Apply visual effects to images without editing them externally. Common filter effects may include: Blur, Brightness, Contrast, Saturation, Hue Rotate, and Opacity!
Separator#
The Separator styling section lets you customize the appearance of the separator displayed between marquee items. You can adjust its color, size, and rotation to match your design.
- Color: Choose the color of the separator.
- Size: Adjust the size of the separator.
- Rotate: Rotate the separator to create a different visual effect.
Wrapping Up!#
PowerPack Marquee Widget for Elementor makes it easy to create smooth-scrolling content on your website. You can use it to display announcements, blog posts, images, logos, or promotional highlights with flexible content and styling controls.
With options available in both the Content and Style tabs, you can fully customize how your marquee looks and behaves to match your website design.
This was the complete overview of the Marquee Widget! Hope this helps.