When designing with Elementor, page layout settings play a vital role in your website design.
These settings allow you to control the structure, styling, and even the default design foundation of your pages.
You might be creating a blog, a landing page, or a custom layout; in all cases, understanding these options will help you design with confidence.
In this guide, we’ll walk through Elementor’s page-specific settings and the global layout settings, answer common questions about layout editing, and help you decide the best approach when creating pages.
Understanding Page Layout Settings in Elementor
How to Edit Page Layout in Elementor?
To edit a page layout in Elementor, log in to your WordPress dashboard and go to Pages. Select the page you want to customize and click Edit with Elementor.
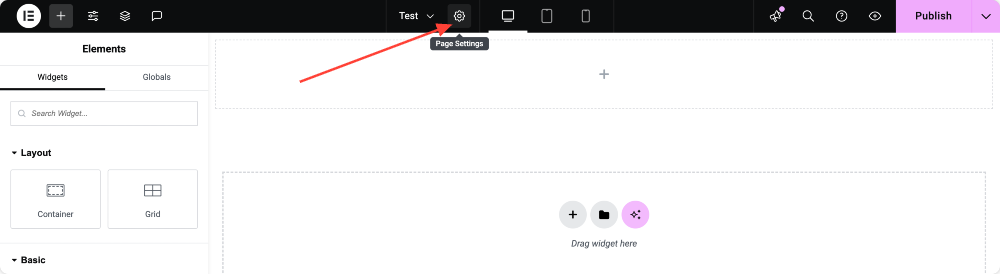
Once you’re inside Elementor, look for the small gear icon at the centre. Clicking this opens the Page Settings panel, where you’ll find options to adjust the general, style, and advanced settings for that specific page.
- General settings manage titles, featured images, comments, and page layout.
- Style settings control background, spacing, and alignment.
- Advanced settings allow you to add custom CSS and animations.
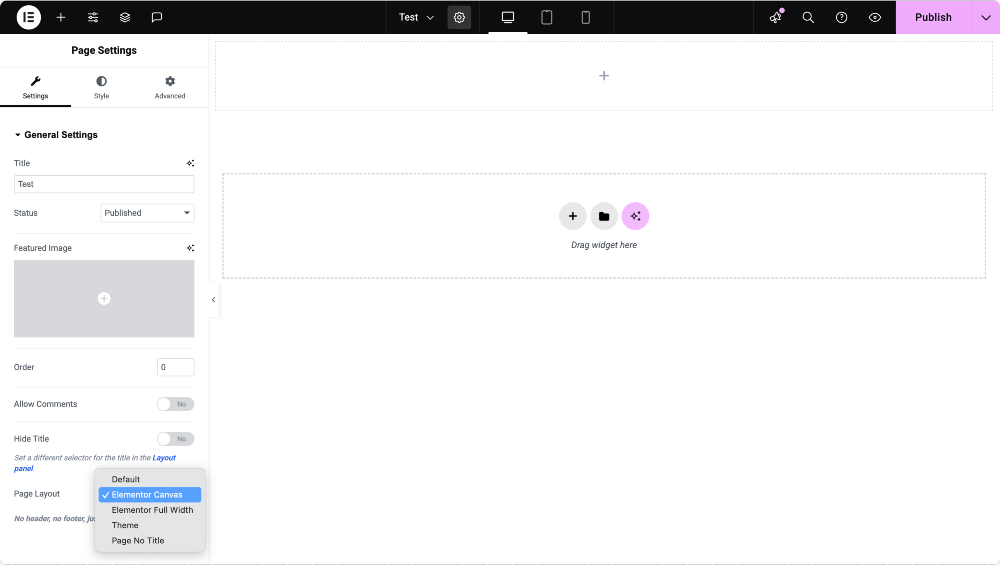
General Settings
General tab is where you set up the essentials for your page. Each option here affects how your page is displayed and how it interacts with your theme or WordPress environment.
- Title: Describe the page title to describe the purpose of your content. A well-chosen title improves readability for visitors and contributes to SEO.
- Status: Choose whether your page is a Draft (not visible to visitors), Published (live on your site), or Private (only visible to logged-in users with the right permissions).
- Excerpt: Write a summary of the page content. This is helpful for search engine snippets and for displaying previews on archive or listing pages.
- Featured Image: Set a featured image to represent the page visually. It is handy when sharing links on social media or when displaying posts in blog grids and widgets.
- Order: Use numbers to arrange the sequence of your pages in menus or page lists. Pages with lower numbers appear first, helping you control the order of display.
- Allow Comments: Decide whether visitors can leave comments on the page. This is usually enabled for blog posts but often disabled for landing pages or static content.
- Hide Title: Toggle this option if you want to remove the default page title and start with a clean canvas. This is
- Page Layout: Elementor gives you several page layout options to control how your content appears. Each option serves a different purpose, depending on the type of page you want to create.
- Default: This layout follows the default page template set in Elementor Panel >> Hamburger Menu >> Site Settings. It keeps the design structure defined by your theme. Ideal for regular pages or blogs where you want consistency across your site.
- Elementor Canvas: Provides a completely blank page with no header, footer, or sidebar. This option is perfect for distraction-free designs such as landing pages, coming soon pages, or sales pages.
- Elementor Full Width: Keeps the header and footer from your theme but removes the sidebar, allowing the main content to stretch across the full width of the screen. A good choice when designing immersive layouts, hero sections, or full-width sliders.
- Theme: Uses the default page template from your active theme. If your theme comes with multiple template variations (like “No Sidebar” or “Content Only”), they may also appear here.
- Page No Title: Removes the page title while keeping the rest of the theme’s structure intact. This option is helpful when you want a clean design without the default title showing at the top.
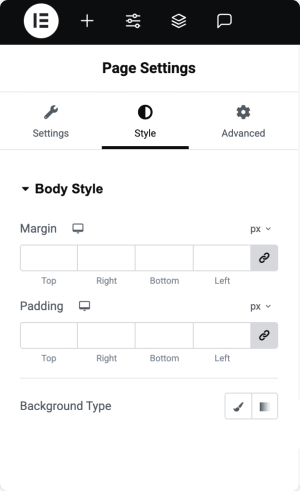
Style Settings
Style tab focuses on the visual appearance of your page. Here, you can define the background & spacing that frames your content.
- Background Type: Choose a solid color, gradient background, or image to set the mood for your page. A well-selected background creates visual impact and reinforces your branding.
- Spacing: Adjust margins and padding to control how much space appears inside and around your content. Margins push elements apart, while padding creates breathing room inside a container.
You can also set text alignment, responsive design settings, and spacing adjustments to ensure your page looks good across desktops, tablets, and mobiles.
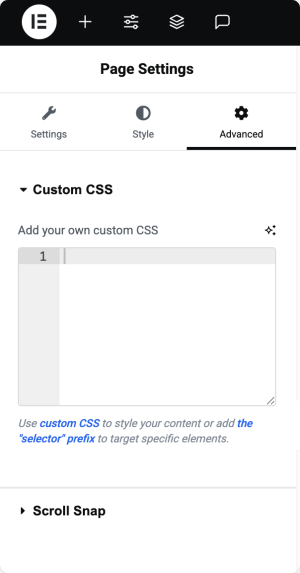
Advanced Settings
For more flexibility, Elementor includes an Advanced tab with options that go beyond the basics.
- Custom CSS: Add your own CSS code to style specific elements. The code here applies only to the current page, giving you the freedom to make unique customizations without affecting the rest of your site.
- Scroll Snap and Motion Effects: Add animations or scrolling effects for extra visual appeal.
The Advanced tab is where designers and developers can truly customize the look and feel of a page.
Global Layout Settings
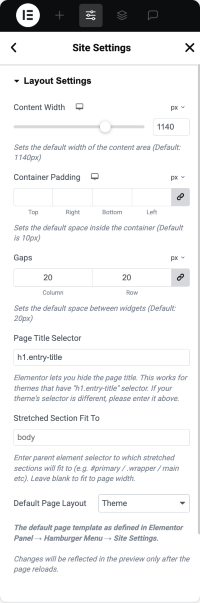
While Page Settings control individual pages, Global Layout settings let you define defaults for your entire site. To access global settings, open any page in Elementor, click the Site Settings icon at the top-left, and select Layout.
From here, you can adjust:
- Content Width: Define the maximum width of your content. The standard setting is 1140px, which works well for most desktop screens.
- Container Padding: Set the default inner spacing for containers. You can apply the same padding on all sides or customize top, bottom, left, and right individually.
- Gaps: Control the space between columns and rows inside containers. This helps maintain clean alignment and consistent spacing.
- Page Title Selector: If your theme uses a unique selector for page titles, specify it here. This allows Elementor to properly hide or style page titles.
- Stretched Section Fit To: Define which HTML tag Elementor should use when stretching sections to full width. The most common tag is body, but some themes may use a different wrapper.
- Default Page Layout: Choose a global default such as Elementor Canvas or Elementor Full Width, instead of relying on your theme’s settings for every new page.
Once you’ve configured your preferences, click Save Changes to apply them across your site.
What Is the Default Layout Width in Elementor?
Elementor’s default layout width is 1140 pixels. This width is widely used because it provides a comfortable reading experience on desktop screens while still adapting well to tablets and smaller devices.
You can change this setting in Site Settings >> Layout if your design requires a narrower or wider layout.
What Is the Optimal Way of Creating a Page with Elementor?
The optimal way depends on your goal:
- If you’re building a regular content page or blog, stick with the Default layout so your header, footer, and sidebar remain intact.
- For landing pages or sales funnels, use Elementor Canvas for a distraction-free design.
- If you want wide, immersive layouts but still need navigation and footer elements, go with Elementor Full Width.
A good practice is to set your global defaults first, so all new pages start with your preferred structure. Then, fine-tune individual pages using the Page Settings panel when needed.
Wrapping Up!
Page Layout settings in Elementor give you control over both individual pages and your site as a whole.
By learning how to use General, Style, Advanced, and Global Layout settings, you can create designs that look professional, are easy to manage, and match your website’s goals.
If you’re building a one-off landing page, the page-specific settings will be enough.
But if you’re working on a larger website, setting up global defaults will save time and ensure design consistency across all pages.
With these setting options, Elementor gives you the flexibility to design your website exactly the way you envision it.
