If you’re looking to create a stunning image scrolling effect in Elementor, you’re in the right place!
The image scrolling effect is an excellent technique for showcasing large images in a confined space. If your website has limited space but you want to display expansive images without compromising design and quality, the image scrolling feature is the perfect solution.
In this post, we’ll guide you on how to create an impressive image scrolling effect in Elementor without the need for any coding!
How Do I Make a Background Image Scroll in Elementor?
If you want to create an image scrolling effect, the best tool for the job is PowerPack Elementor Addons.
PowerPack Addons for Elementor gives you more than 80 creative widgets, including the handy Scroll Image widget, so you can build awesome websites without having to deal with complicated code.
These widgets are designed to be super easy to use, making them perfect for both beginners and experts using Elementor.
No matter if you’re just starting with Elementor or you’re already an expert, PowerPack Addons has got you covered.
Now, let’s check out the main features of the Scroll Image widget in PowerPack
Features of Scroll Image widget
Each of the Scroll Image widget’s features contributes to the overall flexibility and customization options offered by the Scroll Image widget, allowing you to create engaging and visually appealing scrolling effects tailored to your specific preferences and the needs of your website.
Trigger Options: Hover or Mouse Scroll:
- This feature allows you to determine how the image scrolling effect is triggered.
- Hover: If you choose “Hover,” the image scrolling effect will activate when a user hovers their mouse over the image.
- Mouse Scroll: If you choose “Mouse Scroll,” the scrolling effect will be triggered by the user scrolling with their mouse
Adjust Scroll Speed:
- This feature enables you to control the speed at which the image scrolls during the specified trigger event (hover or mouse scroll).
- You can set the scroll speed to be faster or slower, depending on your design preferences and the desired user experience.
Scroll Direction: Vertical or Horizontal:
- The Scroll Image widget allows you to define the direction in which the image scrolls.
- Vertical: If you choose “Vertical,” the image will scroll up or down.
- Horizontal: If you choose “Horizontal,” the image will scroll from left to right or vice versa.
Reverse Direction:
- This option lets you invert the default scrolling direction.
For example, if you initially set the direction as vertical, enabling the “Reverse Direction” option will make the image scroll in the opposite vertical direction.
Plenty of Image Styling Options:
- The widget provides various styling options to customize the appearance of the scrolling image.
This includes settings for adjusting the image size, applying overlays, adding borders, changing opacity, and incorporating other visual enhancements to match your website’s design.
Create an Image Scrolling Effect in Elementor Using the PowerPack Scroll Image widget
Now that we’ve covered the features of the Scroll Image widget let’s walk through the steps to use this widget and create an image scrolling effect.
Before we begin, ensure that you have both Elementor and PowerPack Addons installed and activated on your WordPress website.
Step 1: Create a Page
Log in to your WordPress website and go to Pages >> Add New. You can also edit an existing page.
Next, give your page a proper name, and click on the Edit with Elementor button.
Step 2: Drag and drop the Scroll Image widget
When you’re in the Elementor editor, start by typing ‘scroll image’ in the search bar. Locate the widget in the results and drag and drop it onto the page.
During this process, ensure to look for the PowerPack ‘PP’ sign on the top-right corner of the widget to confirm that it’s part of the PowerPack Addons.
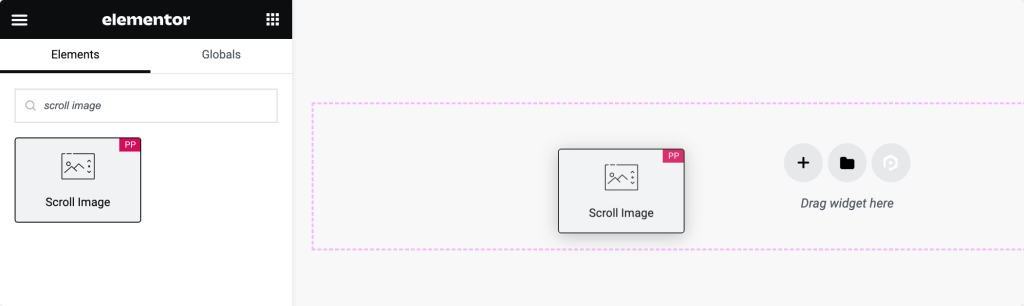
After placing the widget on the page, go to the Content tab of the widget to proceed with the configuration.
Step 3: Customization in the Content tab
In the Content tab of the Scroll Image widget, you’ll find two main sections:
- Image
- Settings
Image Section:
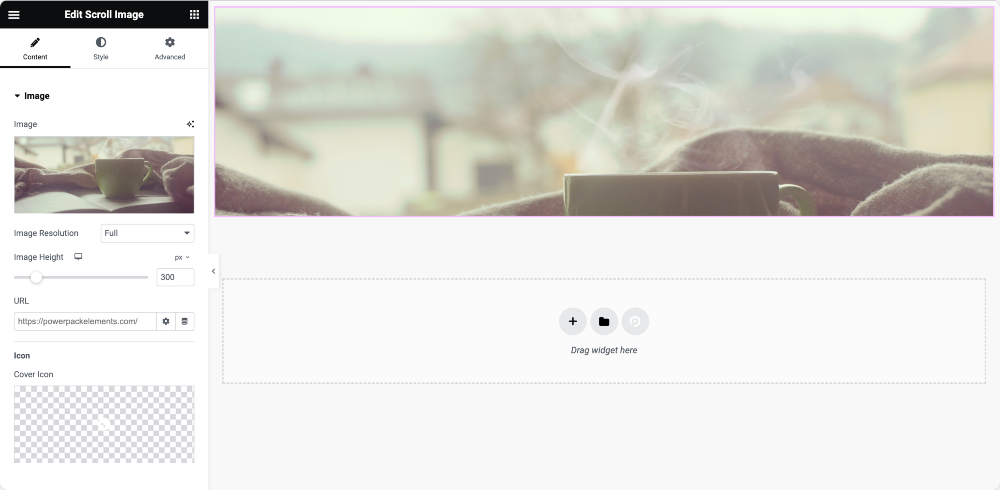
- Image Tab: Using this tab, you can add the image that you want to be scrollable. Adjust the size and height of the image according to your preference.
- Link & Icon: Optionally, link the image to a URL and add an icon over the image.
Settings Section:
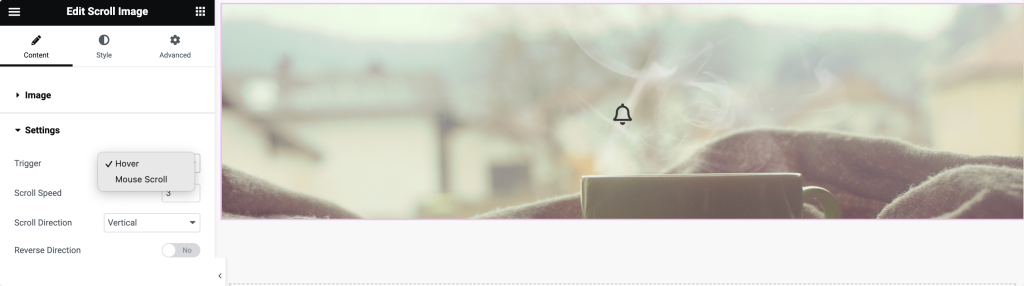
- Trigger Options: Choose how the scrolling effect will be triggered. Options include Hover and Click.
Selecting “Hover” triggers the scrolling effect when the user hovers over the image, while “Click” triggers it when the user clicks on the image. - Scroll Speed: Adjust the speed at which the image will scroll during the chosen trigger event.
- Scroll Direction: Determine whether the image will scroll horizontally or vertically based on your design preference.
- Reverse Direction: Toggle this option if you want to reverse the default scrolling direction.
Step 4: Customization in the Style tab
Image Options:
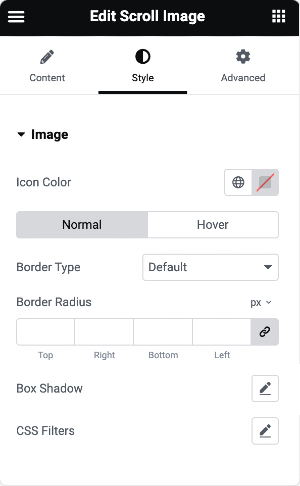
- Icon Color: Choose the color of the icon displayed on the image.
- Border Properties: Add borders to the image in both normal and hover states. Adjust properties such as width and radius.
- Box Shadow and CSS Filters: Enhance the image’s visual appearance by applying box shadow and CSS filters.
Overlay Options:
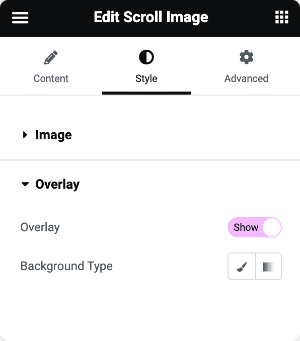
- Overlay Background Type: Choose between Classic or Gradient overlays.
- Classic Overlay: Pick a simple color for the overlay.
- Gradient Overlay: Select primary and secondary colors for a gradient overlay. Adjust the ratio in which these colors appear.
By navigating through these sections, you can precisely customize the behavior, appearance, and style of the Scroll Image widget in Elementor without the need for coding.
Once you configure all the settings, remember to save the changes.
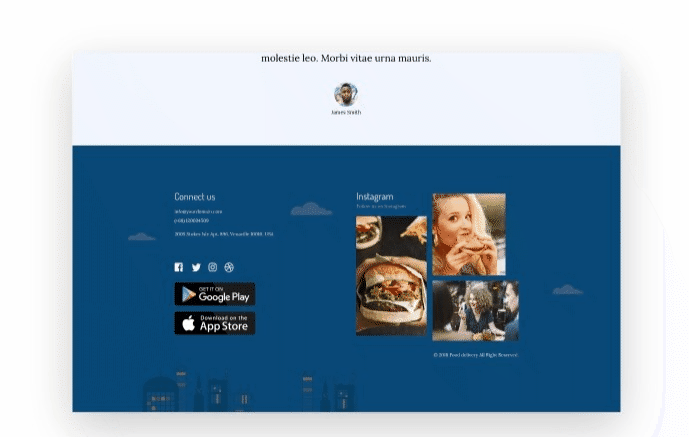
And this is how the PowerPack Scroll Image widget looks on the live page:
Wrapping Up!
This is the step-by-step guide to creating a visually stunning image scrolling effect in Elementor using the PowerPack Elementor Addons.
If you face any difficulty following the steps mentioned in this article, please feel free to connect with us or drop your queries in the comment section.
Stay connected with us on Twitter, Facebook, and YouTube for more updates.
