Looking for the easiest way to customize WooCommerce checkout page with Elementor?
A well-looking and appealing checkout page helps enhance your customers’ shopping experience and checkout process.
In this article, we’ll learn how you can easily customize WooCommerce checkout page with Elementor and PowerPack Addons – Without adding any HTML CSS and code!
Why Customize Your WooCommerce Checkout Page?
Customizing your WooCommerce checkout page is a great way to make your online store more effective and user-friendly. Here’s why it’s important:
- Seamless Shopping Experience: A well-designed checkout page makes it easier for customers to complete their purchases. When everything is clear and straightforward, people are less likely to get frustrated and abandon their carts.
- Match Your Brand: Your checkout page is one of the last things customers see before they finalize their order. By customizing it, you can ensure it matches the rest of your website’s look and feel. This consistency helps build trust and makes your store look more professional.
- Boost Your Sales: A streamlined checkout process can lead to more sales. By removing unnecessary steps or distractions, you make it flexible for customers to focus on completing their purchases, which can boost your conversion rates.
- Personalization: Customizing the checkout page allows you to add personal touches, like a thank you message or a special offer. These little details can enhance the overall shopping experience and encourage repeat business.
How Do I Customize WooCommerce Checkout Page Using Elementor?
Now that you understand the importance of customizing the checkout page, you might be asking yourself, “how do I customize the WooCommerce checkout page”
If you are familiar with WordPress and have experience in using the Woocommerce plugin, you already know that the Woocommerce checkout page design depends on the theme you are using on your website.
Apart from the default theme design, you can add custom CSS to customize the WooCommerce checkout page. However, both ways are not user-friendly, as theme customization limits you in many ways, and using custom CSS is a cumbersome task for novice users.
One of the easiest ways to customize your WooCommerce page is using Elementor and PowerPack Addons.
PowerPack Addons is one of the best addons you can consider using with your Elementor page builder. It has 80+ creative widgets, including powerful widgets to customize your WooCommerce site’s pages without juggling any code.
To customize the WooCommerce checkout page, you can use the PowerPack Woo Checkout Widget for Elementor. This widget included plenty of styling options that let you easily change the design of the default WooCommerce checkout page in a record time.
The best part is that you don’t have to write a single code for styling your checkout page.
How To Customize WooCommerce Checkout Page With Elementor and PowerPack
If you prefer watching a video, you can check the video below to learn the WooCommerce checkout page customization tutorial.
Now without any further ado, let’s see how you can use the PowerPack Woo Checkout Widget to customize the WoCommerce Checkout page with Elementor.
Before we proceed, ensure you’ve installed & activated WooCommerce, Elementor, and PowerPack Addons for Elementor on your WordPress website.
Once you’ve activated all three plugins, proceed to the next step.
Step 1: Edit the Default WooCommerce Checkout Page
WooCommerce automatically creates the checkout page on your site. And this is what the design of the default WooCommerce Checkout page looks likes:
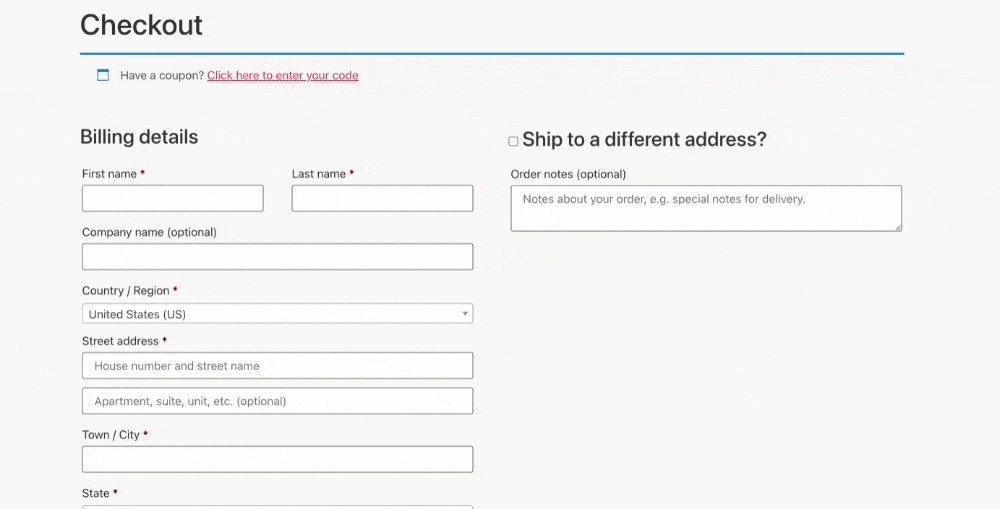
As you can see, the default design of the WooCommerce Checkout Page is very simple and basic. This is where you can use the combination of WooCommerce, Elementor, and PowerPack add-ons to edit the default WooCommerce page.
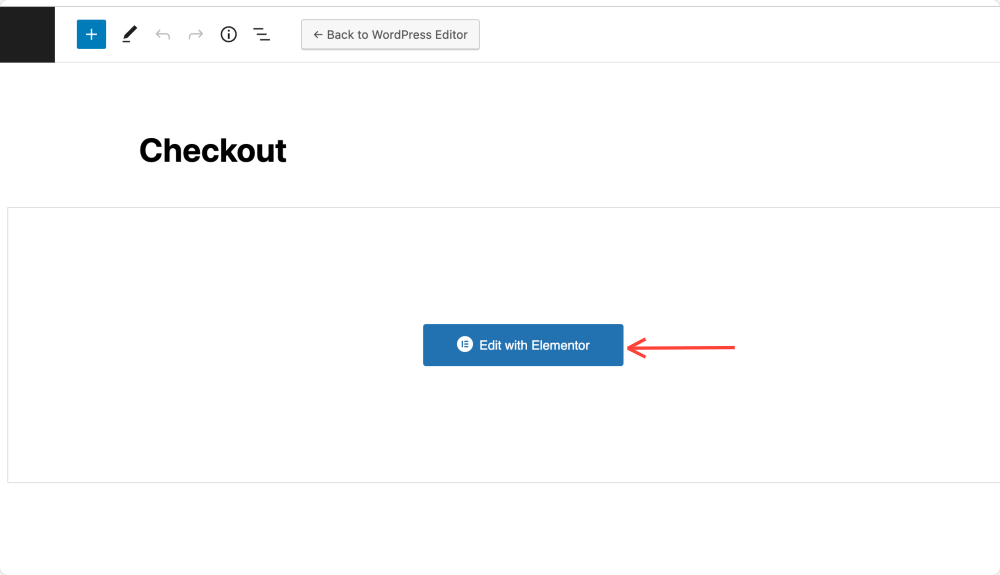
First, go to your WordPress admin dashboard and click Pages. Now look for the “Checkout” page.
Next click on the Edit with Elementor button to customize the page in Elementor editor.
This will take you to the Elementor editor. Now, you can design your Checkout page using PowerPack’s Checkout widget.
If you’d like, you can create a new page, set it as the default WooCommerce checkout page, and customize it with Elementor.
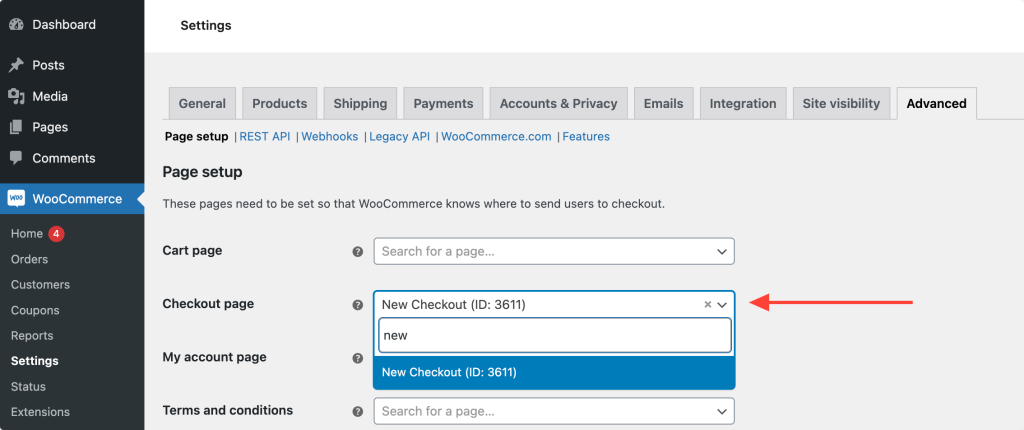
To change the default WooCommerce checkout page, in your dashboard click WooCommerce >> Settings.

When the settings page opens, go to the Advanced tab and select the page you created earlier as the Checkout page.
Step 2: Change the Page Layout
Next, you need to change the Page Layout and disable the Title.
To do that, click on the ⚙️ icon on the bottom left corner of the page.
Once the setting opens, toggle on the Hide Title option and select Page Layout as Elementor Full Width or Elementor Canvas.
Step 3: Drag and Drop the PowerPack Woo Checkout Widget
Search for the Woo – Checkout widget, and drag and drop it into the page. Make sure to check the PP icon on the right corner of the widget.
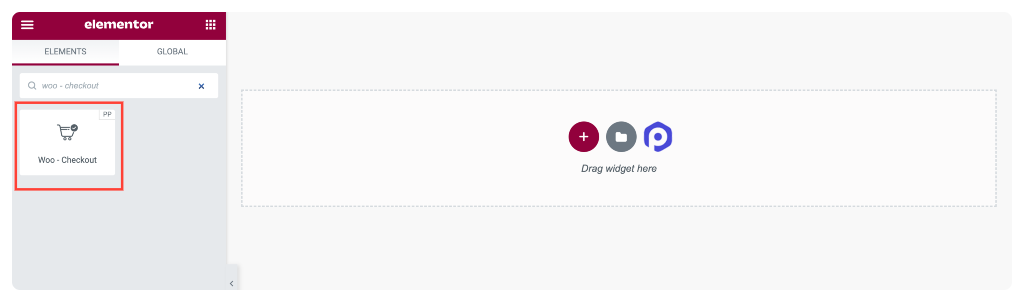
The checkout table appears as soon as you add the widget to the page.
Let’s see the customization options you get in the PowerPack Woo-Checkout widget.
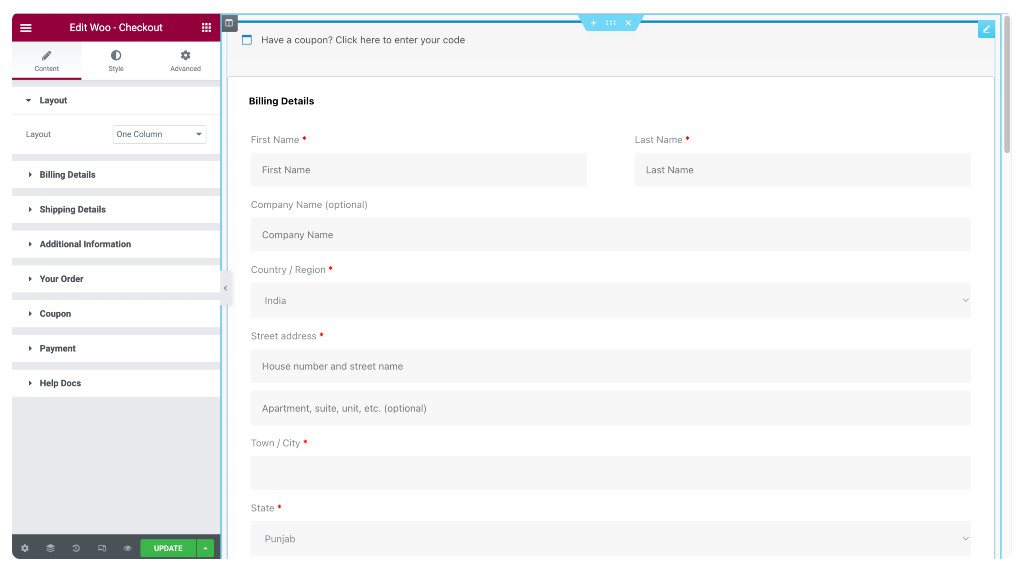
Step 4: Customize the Content tab of the Checkout Widget
The Content Tab of the Checkout widget includes 7 subsections:
- Layout
- Billing Details
- Shipping Details
- Additional Information
- Your Order
- Coupon
- Payments
Let’s explore the options of each subsection one by one.
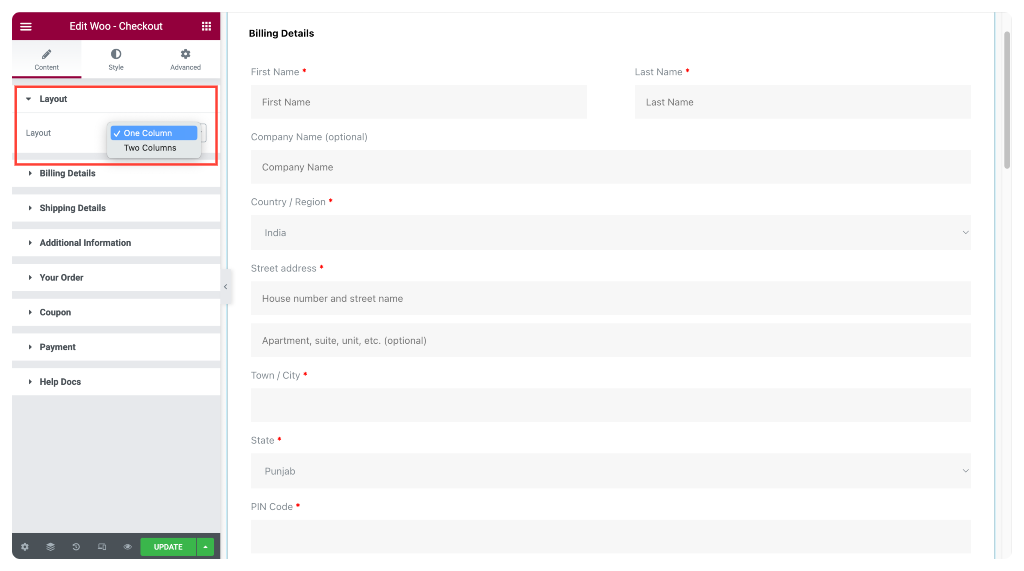
Layout
In the Layout subsection, you can select One Column or Two Columns for your cart page layout.
WooCommerce Checkout Page in One Column Layout Style
WooCommerce Checkout Page in Two Columns Layout Style
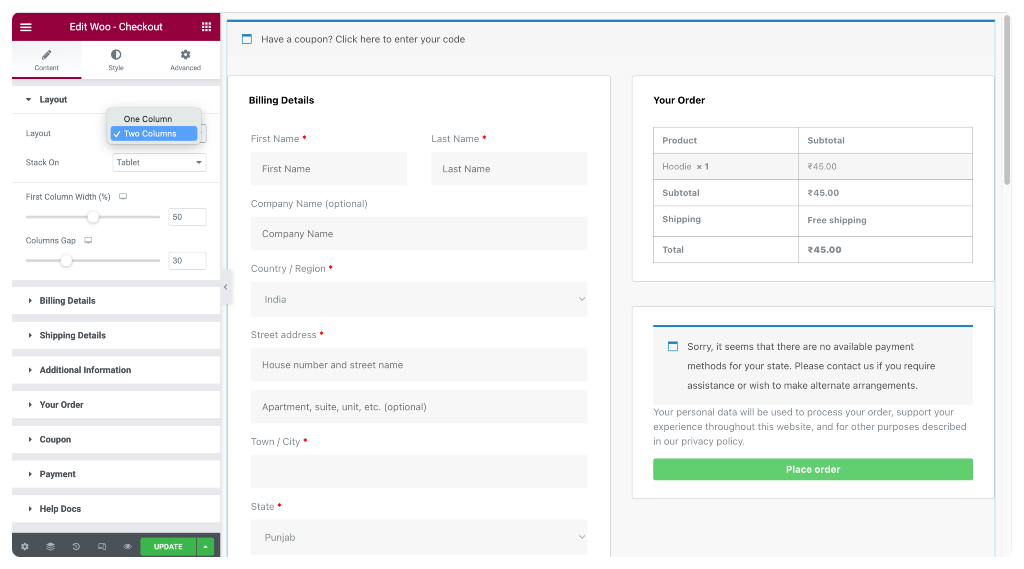
If you select the layout as Two Columns, you further get the following options:
- Stack-On – Displayed responsive columns on mobile and tablet screens.
- First Column Width – Defines the width of the first column.
- Columns Gap – Define the space between the first and second columns.
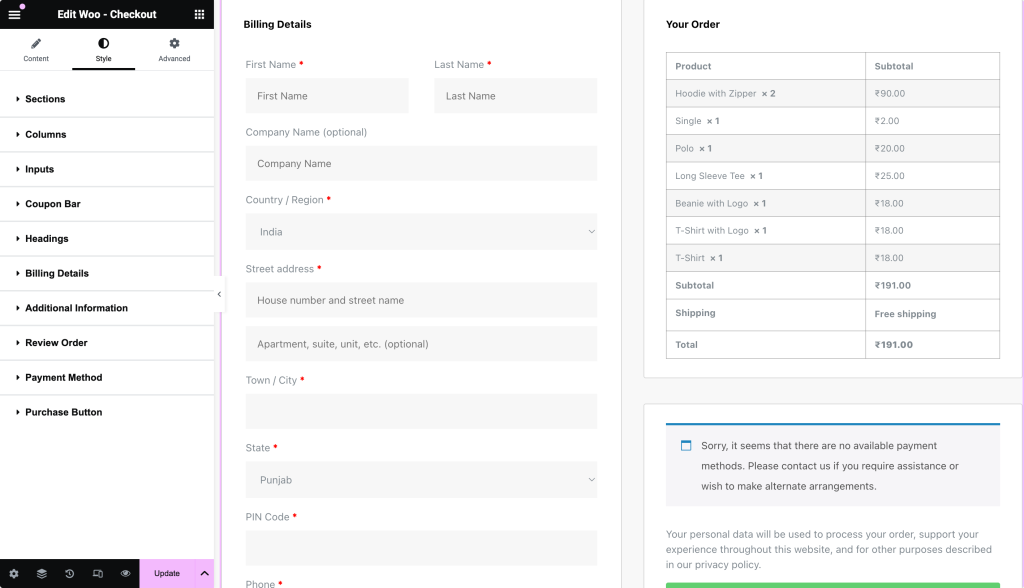
Billing Details
This subsection allows you to change the custom text of the Billing Details section of the Checkout page.
For instance,
- You can change the Section Title.
- Set alignment to Left, Center, or Right.
- Customize Form Items’ Label & Placeholder texts however you like.
The subsections, as mentioned earlier, offer similar customization options as Billing Details. Choose from various options within each subsection, and then customize the content of the Checkout Page as you see fit.
Step 5: Customize the Style Tab of the Checkout Widget
With PowerPack Woo – Checkout Widget, you can customize every single element of your WooCommerce cart page. For example, you can alter typography, change colors, add borders and padding, and more.
There are 10 sections in the style tab of the Woo – Checkout Widget:
- Sections
- Columns
- Inputs
- Coupon Bar
- Headings
- Billing Details
- Additional Information
- Review Order
- Payment Method
- Button
Let’s take a closer look at each of these sections.
Sections
From here, you can style all the sections of the Checkout Page at once.
You can choose the background style for each section, opting for either a classic or gradient background.
You also have the option to add a border around each section, with styles like solid, double, dotted, dashed, and groove.
Additionally, you can adjust the spacing and padding for each section, controlling the distance between sections and the space between the content and the section’s box.
Finally, you can add a box-shadow effect to give the sections a more three-dimensional look.
Columns
Here, you can separately style both columns to make the Checkout page more visually appealing.
You can choose a classic or gradient background and add a border around each column. The border can be solid, double, dotted, dashed, or groove.
You can also give the columns soft edges with the border radius option.
Add a box shadow effect to make the columns stand out and create space between the table and the columns by adjusting the padding.
With these customization options, you can create a checkout page that looks unique and professional.
Like the Layouts & Columns, you customize the other section of the Checkout Page with the easy styling options of Woo – The checkout widget by PowerPack Elementor Addons.
All styling options are self-explanatory; play around with the features and create your own Checkout page designs.
Wrapping Up!
Customizing the WooCommerce checkout page with Elementor is a great way to enhance the shopping experience for your customers and make your online store stand out.
With Elementor’s powerful visual editor & PowerPack’s creative Woo – Checkout widget, you can create a unique and personalized checkout page that meets your business needs and showcases your brand identity.
Following the simple steps outlined in this blog post, you can easily customize your WooCommerce checkout page with PowerPack addons and take your online store to the next level.
More From the Blog:
- How to Build a Custom WooCommerce Store Using Elementor?
- How to Customize the WooCommerce My Account Page using Elementor?
- How to Create a WooCommerce Product Carousel Using Elementor?
Please drop your comments here; we’d love your replies.
