
Are you looking for a way to customize your website’s WordPress User Registration page? You have landed on the right page. In this article, we will take you through the process of creating a custom WordPress user registration page using the Elementor Page Builder.
There are multiple reasons to allow users to register on your website using the user registration form. Enabling the registrations is easy, but creating a visually appealing User Registration page requires a bit of work.
In this tutorial, we will take you through a step-by-step process of enabling user registrations on your website and creating a custom-designed user registration page.
Before that, let’s answer this question.
Why Create a Custom User Registration Page in WordPress?
If you are enabling user registration for your forum, website, or product website, a custom registration page can add a lot of value to your website’s overall design.
The default design of the WP login page has the WordPress branding and logo, which does not match with any website’s brand design.
Creating a custom design will allow you to deliver a more consistent user experience for the registration process.
Also, you get way more options to tweak the functionality of the form. For instance, you can:
- Add more form fields to get more information about the user who is registering.
- Change the design and visual aspects of the form.
- Enable ReCAPTCHA authentication.
- Define actions after a successful registration.
- Craft custom email message notifications.
- Display your custom success message upon successful completion.
- Hide the form for logged-in users and display a custom message in its place.
Now we know why creating a custom user registration page is beneficial, let’s see how you can create one on your website.
How To Create a Custom WordPress User Registration Page Using Elementor
In this section, we will go through a step-by-step process of creating a custom user registration page using the Elementor page builder.
WordPress Tools You Will Need
In this tutorial, we will need plugins installed and activated on your website.
Elementor

Since we will be creating a page using the Elementor page builder, make sure it is installed and activated on your website. You can go with the Elementor Pro version as well, but the free version will work as well.
PowerPack Addon for Elementor
We will be using the PowerPack Addon Registration Form widget. This widget allows you to add a custom user registration form to your website.
Allow WordPress User Registration
The first thing you need to do is enable memberships on your website. To do this, go to Settings >> General in your WordPress admin dashboard. Here, you will see the membership options.
Click on the check box to enable registrations. Now select the role for which you want the user to register.
You select from any of these user roles:
- Subscriber
- Author
- Editor
- Contributor
- Administrator
Each user role has different permissions, and you can further tweak them using a third-party plugin.
If you are not sure which user role to go with, we would recommend going with the Subscriber role. This is because they have limited access and can’t create posts.

Select the user role you want to set for every registration and click on the Save button.
Now, we can go ahead and start creating our user registration page.
Creating a New User Registration Page
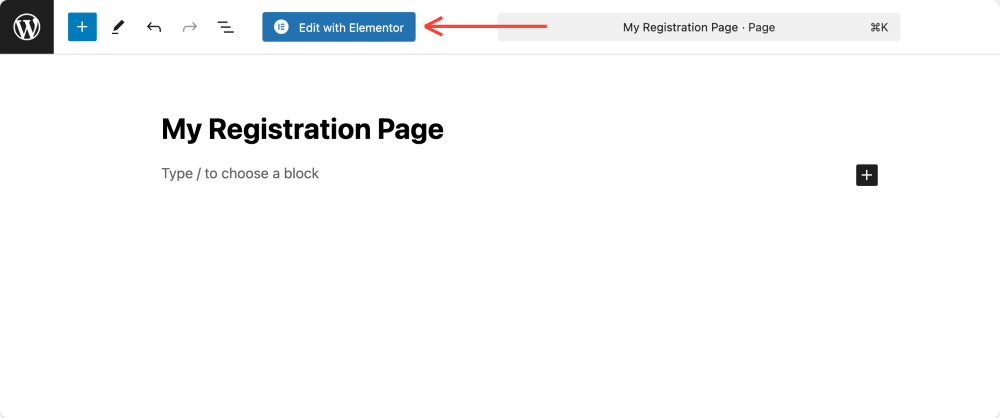
Step 1: Firstly, add a new page. To do this, go to the WP admin dashboard and go to Pages >> Add New. Now, give your registration page a proper name and click on the Edit with Elementor button.
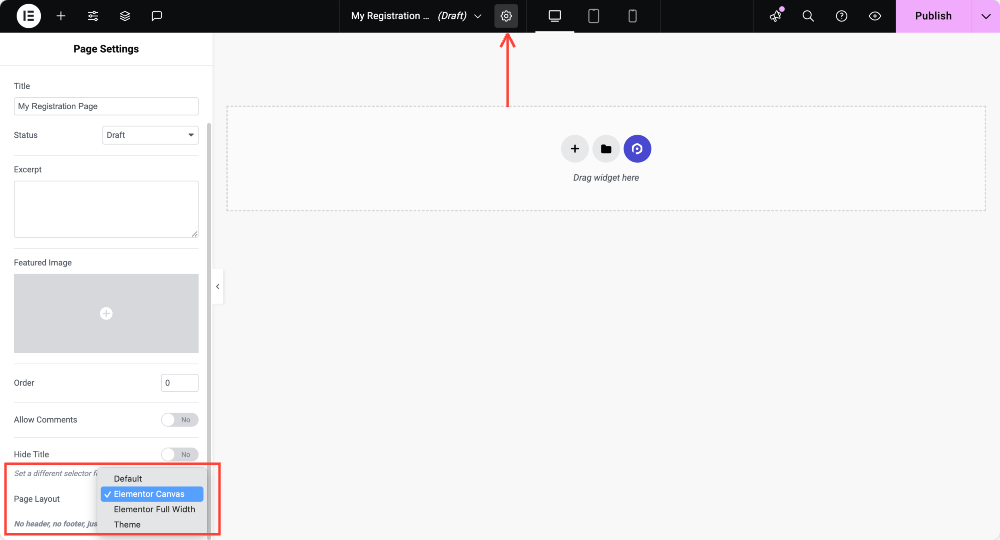
Step 2: Now, once you are in the editor, start by changing the page’s layout to Elementor Full Width or Elementor Canvas. For this, click on the Page Settings ⚙ at the top of the page and select the page layout as full width or canvas.
Step 3: Now, let’s add structure to your page. We are adding 3 3-column layouts for the page.
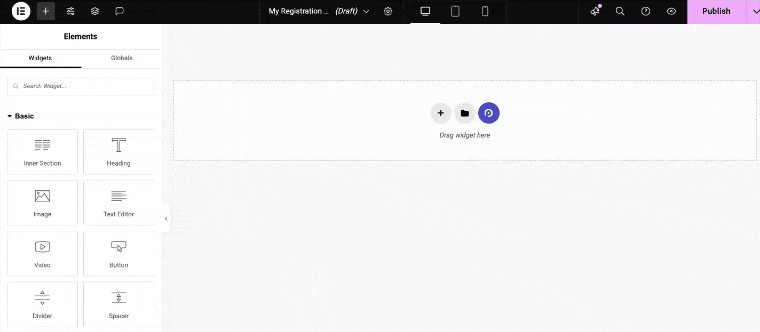
Step 4: Let’s add the most crucial aspect of the page: the User Registration widget. Look for the “Registration Form” widget in the widget list. Make sure you see the PowerPack icon at the top left corner of the widget.
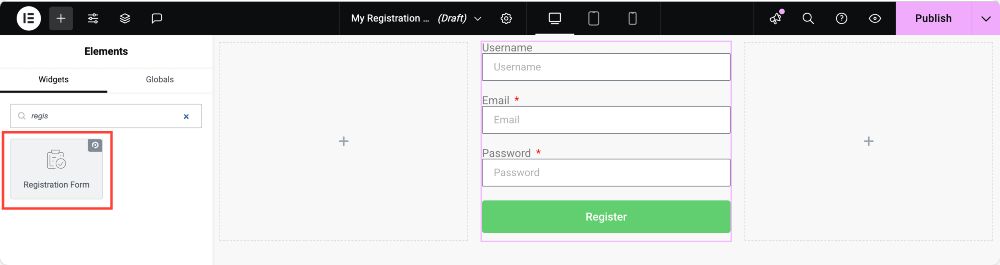
Once you have added the widget, you will see options to customize the form.
Step 5: Content Tab
In the Content tab, you can make changes to the functionality of the form. Let’s take a look at the subsections:
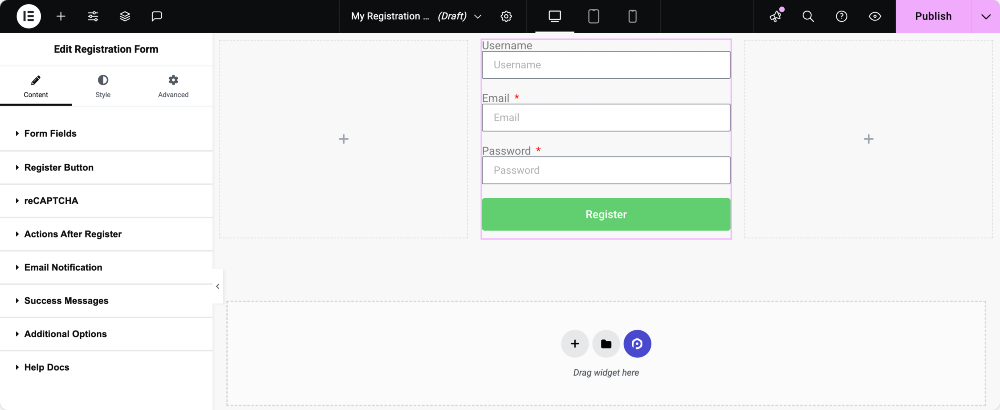
- Form Fields: Here, you can add or remove fields from your registration form. If you wish to add any new fields, you can click the “+ Add New” button. You can select the type of fields from the list and easily give them a name, placeholder, default value, etc. Further, you can change the input field size and enable/disable the label and required mark.
- Register Button: You can change the button text, size, width, alignment, and the icon for the register button.
- reCAPTCHA: If you have the reCAPTCHA API key set up in the PowerPack settings, you can enable Google reCAPTCHA on your form.
- Action After Register: Once the form is successfully submitted, you can redirect the user, auto-login, and send a successful registration email.
- Email Notification: The email notifications subsection allows you to custom-craft the email sent out when a user registers for a user role. You can set the “From Email” and “From Name” as well.
- Success Message: You can choose to show the error message in the form’s position. When a user successfully registers, they get displayed with a message. You can customize the text of the message as well.
- Additional Options: Here, you can choose to hide the form from logged-in users. You can select the user role the user is registering for and enable/disable options like login, lost password, and password strength meter.
Go ahead and make the changes you want. Most of the options are self-explanatory, and you can go ahead and make the change you like.
Here are the changes we made to the form:
- Added Terms of Service checkbox in the form using the “+ Add Item” button and selecting the type as Consent.
- Changed the button text and added an icon on the Register button.
- Changed the Success message for registered users.
- Set the new user role as Subscriber.
If you want to see the changes we did in the Content tab, you can see it in this video:
Now, for the styling changes, head over to the Style tab. Here, you will be able to make changes to the design of the form.
Step 6: Style Tab
You can make typography changes, border changes, and design changes like padding, spacing, colors, etc., for every aspect of the form.
Go ahead and make the styling changes you want. If you want to see the changes I made on my User Registration page, you can check the video I shared earlier.
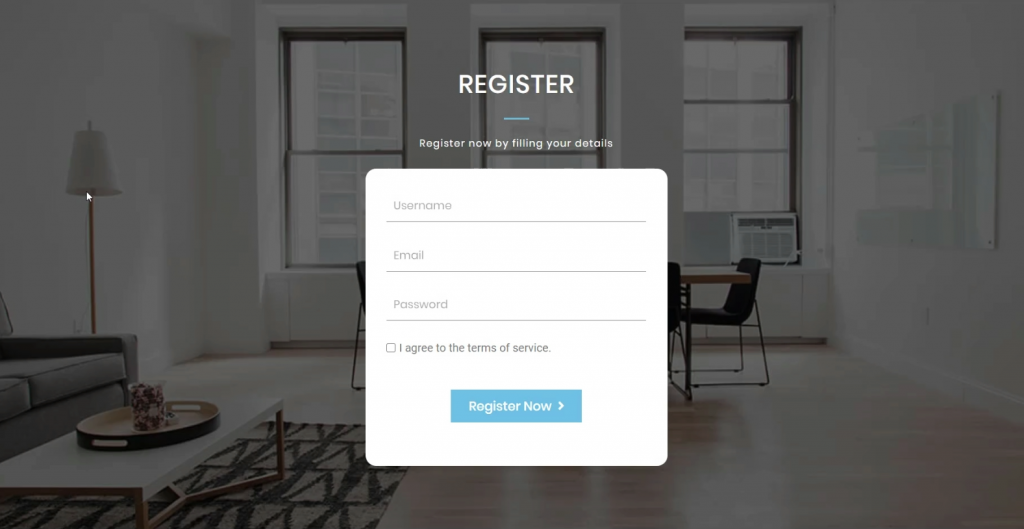
Once made the changes we mentioned above, here is what my registration form looks like:
Now, you need to make the page match the overall theme of your website. To do so, start designing the rest of the page.
This area is totally up to you, and you can design it however you want, as it can vary from person to person. For my section, here is the design I created.
To create a similar design, make these changes:
- Add a background image to the form’s section and align it correctly with the section settings.
- Add a background overlay to the section to highlight the form.
- Change the background of the form and change the border corners to round.
- Add a title and subtitle for the form to complete the page.
Make sure the design and styling are consistent for all the elements on the page.
Once you are done, go ahead and publish the page.
Testing Out the Page
To try out the page, either log out of your WordPress account or open the page incognito. Now, try creating a new user account by entering all the fields and clicking on the Register button.
You should be able to create a new user account upon registering.
What’s Next?
A successfully registered user has an account on your website, and chances are they will log in sooner or later. For that, you would want a good-looking user login page that matches the overall look and feel of the website.
To do this, you can use the PowerPack Login form widget. This widget allows you to customize your WordPress website’s user login page with the Elementor editor.
You can check out this video to see how to customize your website’s login page:
If you found this tutorial useful, do share it!

1 thought on “How To Create a Custom WordPress User Registration Page Using Elementor”
Thanks for this awesome article with a helpful guide for creating a Custom WordPress User Registration Page. I will apply this method to WordPress.