Are you searching for a way to add a custom cursor to your WordPress website with Elementor?
A custom cursor replaces the default mouse pointer and helps you enhance your visitors’ navigation experience on your site.
In this article, we’ll provide a detailed tutorial on adding a custom cursor in WordPress with Elementor and PowerPack Addons.
What Is a Custom Cursor?

The custom cursor feature lets you change the default mouse pointer design so that visitors will interact with your website content in a fun way.
A custom cursor is mainly considered for enhancing any website’s appearance. But apart from the design concept, the custom cursor can help to boost your website interaction and stand out your webpage from the crowd.
How do I create a custom cursor in Elementor?
Websites use different extensions; some follow codes to create unique cursor designs. PowerPack Elementor Addons comes with an extension to create a custom cursor on your WordPress website.
PowerPack Addons is one of the best add-ons for the Elementor page builder. It has over 80 powerful widgets and 150+ predesigned templates, using which you can create a fantastic WordPress website using Elementor.
In addition, PowerPack also consists of many extensions and additional features to enhance your website’s functionalities and look.
PowerPack Custom Cursor feature for Elementor lets your visitors undergo a fantastic navigation experience by replacing your default cursor with three interactive mouse cursor styles:
- Display Icon with an Image
Using this option, you can display your mouse cursor in an image format. This feature supports images from all sources like local media, media libraries, and URLs.
2. Follow Image Cursor
Using this mouse cursor style, an image selected by you will follow your mouse cursor wherever you hover over the desktop screen. First, customize the image you want to display and insert the media to this option—done.
3. Follow Text Cursor
Like the following image cursor style, this feature follows the same pattern, but in the place of the image, you can add here a text to trigger users to take action. In addition, you’ll get multiple options to customize the text you’ve added.
To discover more about the features of these three mouse cursor styles by PowerPack Addons, let’s individually look at each in detail.
Add Custom Cursor on Your WordPress Website Using PowerPack Elementor Addons
To add these fantastic mouse cursor designs to your WordPress website, install and activate the Elementor and PowerPack Elementor Addons on your site.
Now, open the page using the Elementor editor and add a new section.

Once you’ve selected a structure, click on the Edit Section icon.

As you click on the edit section option, three tabs will appear on either side of your desktop screen, i.e., the Content Tab, Style Tab, and Advanced Tab.
Navigate to the Advanced Tab, and you’ll see the following interface.
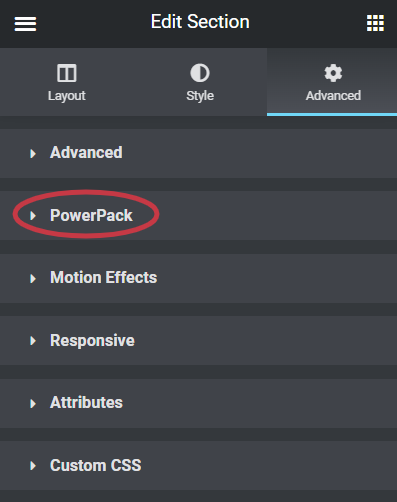
Once you see this interface, go to the PowerPack sub-section.
Clicking the PowerPack section will open the entire extension list offered by PowerPack Addons.
Here, you’ll get the Custom Cursor feature. Toggle on this option to add the custom mouse cursor to your webpage.
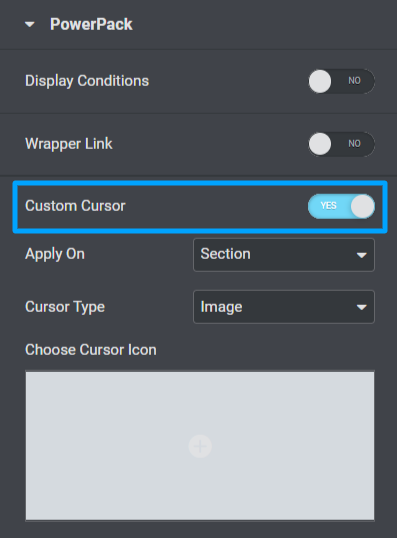
Next, you can customize the options that this feature offers:
- Apply On: This option allows you to choose the Section or Element Class/ID where you want to display the custom cursor.
- Cursor Type: Using this option, you can select the cursor type as Image, Follow Image, or Follow Text.
- Choose Cursor Icon: This option lets you choose the cursor icon. You can insert the image from the media library.
Let’s see each cursor style option individually.
Selecting Image and Follow Image as the Cursor Type
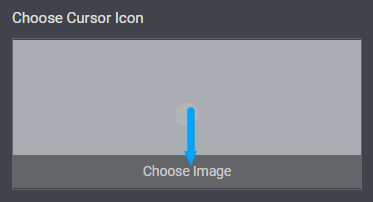
If you choose the Image and Follow Image as the cursor type, you’ll be able to select an image from the media library for the cursor image.
You can insert media from the media library or upload files locally. Also, you can insert an image from the URL.
Selecting Follow Text as the Cursor Type
Selecting Follow Text as the cursor type will open a wide range of customizing options to style the cursor.
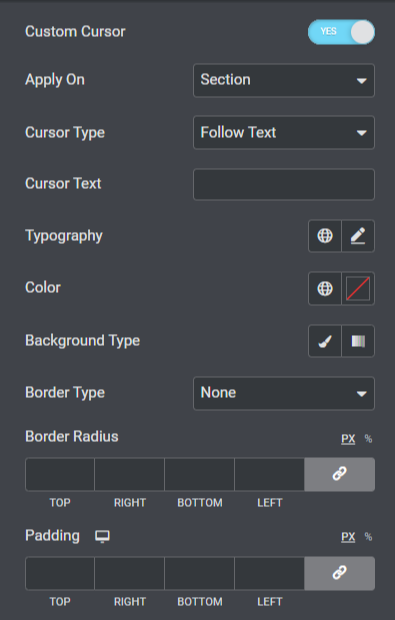
Let’s discuss these options in brief:
- Cursor Text: You can add a custom cursor text using this option.
- Typography: This option allows you to customize the typography of the cursor text.
- Color: You can choose a cursor text color with this option.
- Background Type: Use this option to add a background, solid or gradient, to the cursor text you’ve added.
- Border Radius: Adjusting the border-radius will give the cursor text background an edgy look.
- Padding: This option allows you to adjust the cursor text’s padding, allowing spacing between the text and the background border.
Apply these changes if you want to add a follow text custom mouse cursor on a particular section on your website.

Using PowerPack features will smartly enhance your website to stand out from the crowd. Immense your website’s performance and overall look by using PowerPack Elementor Addons.
Wrapping Up!
We hope this tutorial helped you create a stylish custom cursor in your WordPress website using Elementor page builder.
We cover all possible steps that can help you add a custom cursor to your website via the PowerPack Custom Cursor feature. However, if we miss something, you can raise your queries in the comments.
Click here to get the PowerPack Custom Cursor Extension for the Elementor page builder.
If you’ve reached here, we assume you’ve loved our article, and we are sure you would also love having our other PowerPack Elementor Widgets.
Subscribe to our newsletter for updates related to PowerPack Elementor Addons.
