Images bring websites to life. They help tell stories, highlight key content, and improve user engagement. But for new WordPress users, it’s not always clear how image sizes work behind the scenes.
Why does WordPress create multiple versions of your image? What dimensions should you choose for blog posts, headers, or product images? And how do you keep your images looking sharp while maintaining fast load times?
In this complete guide, you’ll learn everything you need to know about image sizes in WordPress, how they work, where they’re stored, how to customize them, and how to optimize them for the best performance.
Complete Guide on WordPress Image Sizes
How WordPress Handles Your Uploaded Images
When you upload an image in WordPress, it does more than store it. It automatically creates multiple versions of the same image in various sizes.
This ensures that the right-sized image is served, depending on where and how it’s used on your site, such as in thumbnails, posts, galleries, or sliders.
Where Are Images Stored in WordPress?
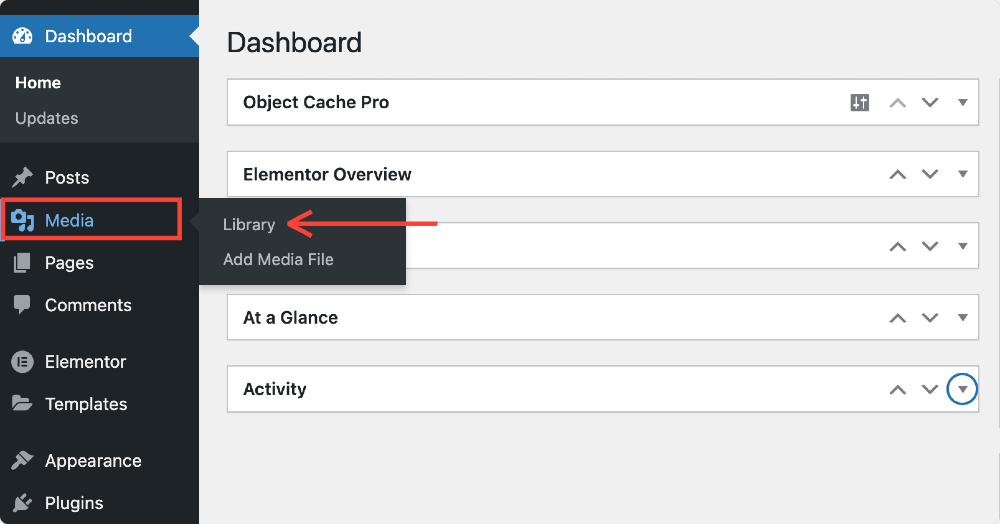
From the admin side, all uploaded media files, including images, are visible in the Media Library. You can access it by going to Media >> Library in your dashboard.
Here, you can view your uploaded images in a grid or list layout. You can also filter by media type (e.g., photo, video, audio) or search using keywords from image titles, captions, or descriptions.
Behind the scenes, WordPress stores your images in the /wp-content/uploads/ directory on your server. By default, this folder is organized by year and month based on when the image was uploaded, for example: /wp-content/uploads/2025/06/
This structured approach makes it easy to manage your media files over time.
If you’re a more advanced user and want to change this structure, some plugins allow you to organize your media into custom folders. However, for most beginners, the default system works just fine.
Default Image Sizes in WordPress
When you add an image, WordPress creates multiple versions of it in different sizes automatically. These default sizes are set in your WordPress settings and are used across different sections of your site depending on your theme and layout.
Here are the standard default sizes WordPress generates:
- Thumbnail – 150 × 150 pixels: Often used in blog archives, sidebars, and galleries.
- Medium – 300 × 300 pixels: Commonly used for smaller in-post images or product thumbnails.
- Large – 1024 × 1024 pixels: Typically used for hero images, featured images, or sliders.
- Full Size – The original image you uploaded without resizing.
Plugins and themes can also create their own custom image sizes to fit specific layout requirements. So, depending on your theme, you may see additional size options when adding images to posts or pages.
How to Change the Default Image Sizes
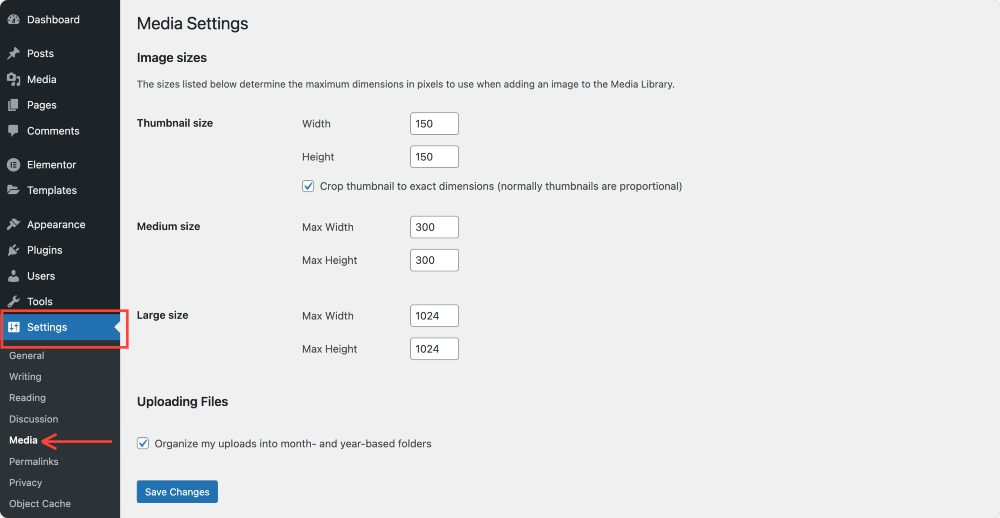
If the built-in image sizes don’t suit your needs, WordPress makes it easy to change them.
To do this, go to your dashboard and select Settings >> Media. Here, you’ll see options to enter your preferred width and height for Thumbnail, Medium, and Large image sizes.
Once you’ve made the changes, click Save Changes at the bottom of the screen. Moving forward, all new images you upload will follow these new dimensions. However, previously uploaded images won’t be affected unless you regenerate them (more on that later).
It’s a good idea to choose image sizes that match the maximum display width of your content area. For example, if your blog post content is 800 pixels wide, uploading a 3000 pixel-wide image serves no purpose and only wastes server space.
Custom Image Sizes in WordPress
Besides the default sizes, you may need more control over how images appear on your site, for example, if you want a square thumbnail for one section and a rectangular one for another.
Developers can add custom image sizes using code in the functions.php file of a theme. For example:
add_image_size(‘custom-size, 400, 250, true);
This tells WordPress to generate a 400 × 250-pixel image with hard cropping enabled. If you’re not comfortable editing theme files, you can use plugins like Simple Image Sizes to add, remove, or regenerate image sizes from your dashboard.
How WordPress Selects Which Size to Display
WordPress is smart about choosing which image size to display depending on the context.
For example, in a blog listing, it might display the thumbnail version, while inside a post, it may choose the medium or large size. The theme you use has a big influence on this behavior. These templates determine what image sizes are loaded and where.
WordPress also supports responsive images using the srcset attribute. This means it automatically serves the best size image based on the visitor’s device and screen resolution. Mobile devices will receive smaller image files, while high-resolution displays (such as Retina screens) may receive sharper versions.
Best Image Dimensions for Common Use Cases
Choosing the correct image dimensions helps maintain consistency across your website and avoids awkward stretching or blurry visuals. Here are some commonly used image types and the sizes that work best:
- Blog Featured Images: 1200 × 630 pixels. This works well for post headers and social sharing.
- Full-Width Banners or Hero Images: 1920 × 1080 pixels. Great for large screens and sliders.
- Logo Images: 250 × 100 pixels. Keeps logos crisp in headers and footers.
- Favicons: 512 × 512 pixels. Required by most browsers.
- Product Images (eCommerce): 800 × 800 pixels. Ideal for square product grids.
Try to use consistent aspect ratios across similar image types. For example, all blog-featured images can follow a 16:9 ratio, while product thumbnails can maintain a square aspect ratio (1:1).
Editing Image Sizes with the Gutenberg Editor
If you’re creating content using the Gutenberg block editor, adjusting image sizes is simple.
Once you add an image block to a post or page, you’ll see options in the sidebar to select predefined sizes, such as Thumbnail, Medium, Large, or Full.
If you have custom sizes registered, they’ll also appear here.’
You can also enter your dimensions directly. Simply enter the desired width and height, and WordPress will automatically adjust the display size accordingly. This doesn’t change the actual file size but only how it appears on the page.
Regenerating Thumbnails After Size Changes
If you change the default image sizes in your settings, WordPress won’t automatically resize old images. To apply the new sizes to previously uploaded images, you need to regenerate thumbnails.
There are several plugins that can help with this. The most popular ones include:
- Regenerate Thumbnails
- Force Regenerate Thumbnails
Once installed, these plugins allow you to resize all existing images with just a few clicks based on your updated settings.
How to Optimize Images in WordPress
Image optimization is essential for improving website speed and performance. Large image files can slow down your site and increase bounce rates, especially for mobile visitors.
Here are the most effective ways to optimize your images:
1. Choose the Right File Type
Use JPEG for photographs and colorful images. It supports compression and maintains good quality at smaller file sizes. Use PNG for graphics, icons, or screenshots where sharp edges and transparency matter.
2. Resize Images Before Uploading
Don’t rely entirely on WordPress to resize your images. Resize them using a tool like Photoshop, Canva, or any online resizer to match the width of your content before uploading.
For example, if your blog content area is 800 pixels wide, there’s no need to upload a 2400-pixel image.
3. Compress Images
You can reduce image file sizes using lossy compression techniques, which remove unnecessary data without a noticeable quality loss. Tools like TinyPNG, ImageOptim, or plugins like ShortPixel, Smush, and Imagify automate this process.
4. Enable Lazy Loading
WordPress has lazy loading enabled by default. This means images below the visible area of the screen load only when the user scrolls down, reducing initial load times and improving performance.
Useful Plugins to Manage Image Sizes
Several WordPress plugins can help you manage image sizes more effectively:
- Simple Image Sizes: Allows you to create and manage custom image sizes without requiring code modifications.
- Regenerate Thumbnails: Recreates image sizes after a theme switch or change in settings.
- Enable Media Replace: This feature allows you to replace an image without changing its URL.
- ShortPixel/Smush/Imagify: Popular image optimization plugins to compress and resize images automatically.
Conclusion
Understanding image sizes in WordPress is one of those small but important things that make a big difference. When done right, your site looks more professional, loads faster, and provides a better experience for your visitors.
Take the time to define your image size settings, optimize your images before uploading, and use the right tools to manage your media files effectively. Once you do, you’ll have a cleaner, faster, and more consistent WordPress site, and that’s something every site owner should aim for.
More From the Blog
- 5 Best Free WordPress Image Optimization Plugins
- How To Create Image Scrolling Effect in Elementor
- Best Websites to Find Royalty-Free Images & Videos
