
Looking for a simple way to show star rating in WooCommerce product pages using Elementor?
Customer reviews can be a powerful element when running an online store. Star ratings give potential buyers a quick visual cue about a product’s quality—and they can be the reason someone hits “Add to Cart.”
If you’re using WooCommerce to power your store and Elementor to design it, you’re already on the right track. And with the PowerPack for Elementor plugin, adding a star rating to your product pages becomes super easy—even if you’re not a tech expert.
In this tutorial, I’ll walk you through the step-by-step process of adding a dynamic star rating to your WooCommerce single product pages using Elementor and PowerPack Addons.
Let’s get started!
Why Star Ratings Are Important for WooCommerce Products
Think about the last time you shopped online. Did you check the star rating before adding a product to your cart?
Chances are, you did—and so do your customers.
Star ratings are one of the most powerful trust signals you can show on a WooCommerce product page. Here’s why they’re so important:
- Build Trust Instantly: When a buyer lands on your product page and sees a 4.5-star rating from 30+ customers, it tells them, “this product is legit.” People trust other people’s experiences more than marketing claims, and a star rating makes that feedback quick and easy to understand.
- Help Shoppers Make Quick Decisions: Customers often scroll through several products in a busy online store before choosing one. Star ratings help speed up their decision-making by giving them a snapshot of how satisfied other buyers were—without needing to read full reviews.
- Increase Conversion Rate: Social proof—like star ratings—can directly influence sales. When people see that a product is well-rated, they’re more likely to buy it. In fact, products with higher ratings often outsell those with no reviews, even if the price is slightly higher.
- Set Honest Expectations: Star ratings give potential buyers a realistic sense of what to expect. If a product has mostly 4-star reviews, users know it’s a solid choice. This transparency leads to fewer returns and better customer satisfaction.
- Improve SEO and Click-Through Rates: When implemented correctly, star ratings can show up in Google search results as rich snippets. That means your products stand out in search listings, which can lead to higher click-through rates and more traffic to your store.
Now that we understand the importance of star ratings for your eCommerce products, let’s walk through how you can easily display them on your WooCommerce product pages using Elementor and PowerPack.
How To Show Star Rating in WooCommerce Product Pages Using Elementor?
What You’ll Need Before Getting Started
Make sure you have the following plugins installed and activated on your WordPress site:
Note: Also make sure at least one of your products should have customer reviews so you can see the rating in action.
1: Edit Your WooCommerce Single Product Template
To display the star rating, you first need to open the Single Product Template in Elementor.
Here’s how:
- In your WordPress dashboard, go to Templates > >Theme Builder.
- Find your existing Single Product template, or create a new one by clicking “Add New” → “Single Product.”
- Click “Edit with Elementor” to open the template in the visual editor.
This is the layout that controls how all your product pages look, so make sure to edit only the design, not the actual product content.
2: Customize the Template Using PowerPack Widgets
PowerPack Addons comes with a powerful WooCommerce Builder that includes specific widgets. These widgets allow you to customize the WooCommerce Single Product and Archive Page templates easily.

Some useful PowerPack WooCommerce widgets you’ll see include:
- Woo – Product Title (shows the product’s name)
- Woo – Product Price (displays the price)
- Woo – Product Meta (shows SKU, categories, etc.)
- Woo – Product Stock (shows stock availability of products)
- Woo – Product Reviews (displays product reviews)
- Woo – Product Rating (this is the one we’re focusing on!)
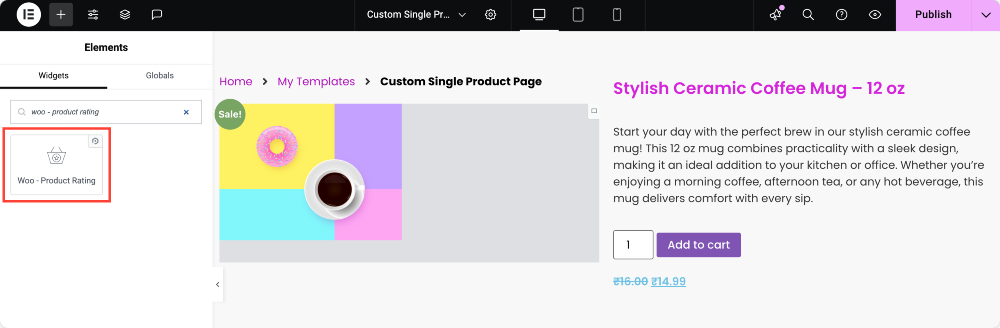
3. Drag and drop the Woo–Product Rating Widget
Now, let’s add the star rating:
- In the Elementor sidebar, use the search bar to look for “Woo – Product Rating”.
- Drag and drop this widget into your layout—typically, right below the product title or near the price works well.
As soon as you place it, Elementor will automatically fetch and display the average rating for the product, if it has any reviews.
No need to enter the rating manually! It’s dynamic; the widget will automatically pull the real review data for each product.
If your product has no ratings yet, the stars won’t show. So, make sure to test this on a product with at least one review.
4. Enable the Review Text (Optional but Recommended)
Want to show how many people have rated the product? You can do that too!
Here’s how:
- Click on the Woo – Product Rating widget to open its settings panel.
- Under the Content tab, you’ll see a toggle called “Review Text.”
- Toggle on this to display the total number of reviews next to the stars.
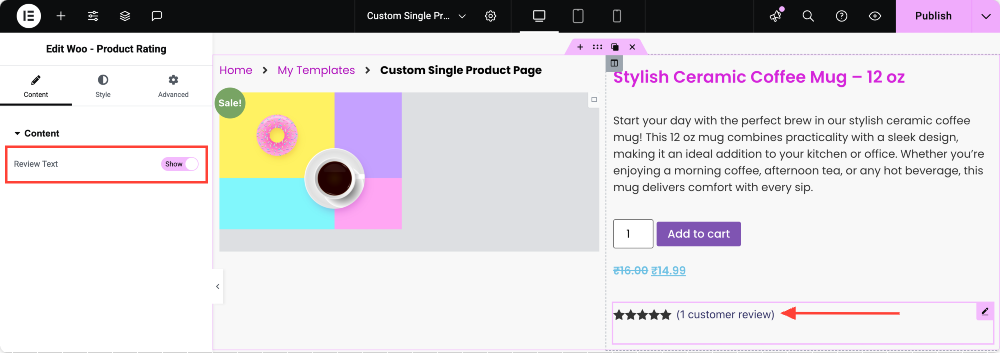
This will look something like: ★★★★☆ (12 reviews) — which gives shoppers even more confidence in the product.
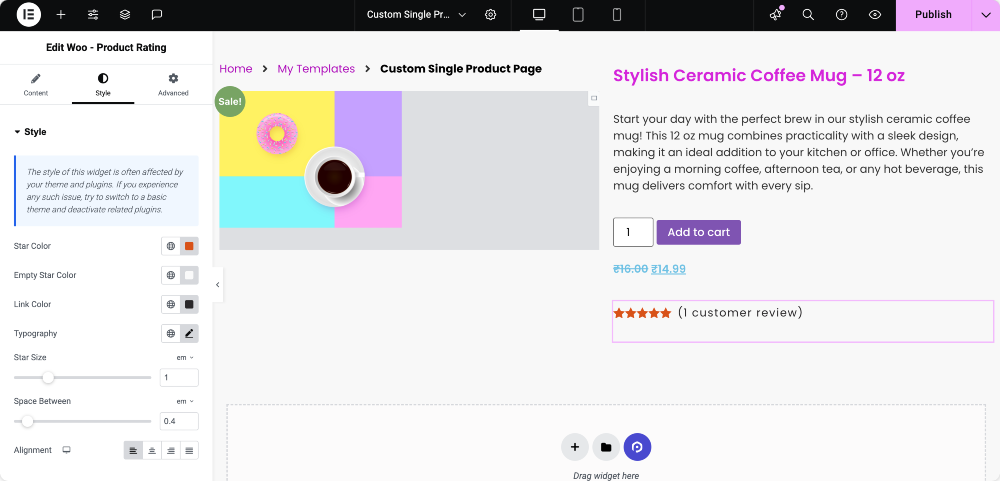
5. Style the Star Rating to Match Your Brand
Once the rating is in place, let’s make it look good!
Click on the Style tab of the widget, and you’ll see a bunch of styling options you can play with:
- Star Color: Choose the color for the filled stars (like gold, yellow, or even your brand color).
- Empty Star Color: Pick a color for the stars that haven’t been filled. A subtle gray usually works well.
- Link Color: If the review text is clickable (like to scroll down to reviews), you can set its color here.
- Typography: Customize the font family, size, weight, and spacing of the review text to match your site’s typography.
- Star Size: Use the slider to increase or decrease the size of the stars to fit nicely in your layout.
- Space Between: Adjust the spacing between each star so they’re not too cramped or spread out.
- Alignment: Choose whether the rating aligns to the left, center, right, or is justified within the widget container.
6. Preview and Publish
Once you’re happy with the layout and styling:
- Click “Preview” to see how the star rating looks on a real product page.
- Hit “Publish” to apply the changes.
Now, go to the front end of your store and view a product page. You should see the star rating showing up exactly where you placed it!
Wrapping Up!
Showing star ratings on your WooCommerce products can really boost credibility and help your customers make informed decisions. With Elementor and PowerPack, adding this feature is super simple and completely customizable.
If you face any difficulty following the steps mentioned in this article, please feel free to connect with us or drop your queries in the comment section.
What are your thoughts on this tutorial? Do share if you found this helpful guide! Also, join us on Twitter, Facebook, and YouTube.
More From the Blog
- How to Create WooCommerce Single Product Page With Elementor: A Step-by-Step Guide
- How To Customize WooCommerce Checkout Page With Elementor
- How To Create a WooCommerce Product Carousel Using Elementor [Step-by-Step Guide]
