Showcasing reviews and feedback from real customers helps you build strong social proof. Reviews help prospective buyers decide whether to invest in your product is worth their penny or not.
Instead of trusting a marketer or a salesperson, consumers rely on real customers’ reviews to opt for a service or a product. 90% of consumers consider these personal recommendations or online reviews of real users helpful while making a purchase.
If you’re running an eCommerce or any online product selling website built with WordPress and looking for a simple yet creative way to display reviews, then you have landed on the right page.
In this article, we’ll guide you on how to display a review section on a WordPress site using Elementor and PowerPack.
That too, without even writing a single line of code. Exciting! Isn’t it?
How Do I Add a Review Section in Elementor Sites
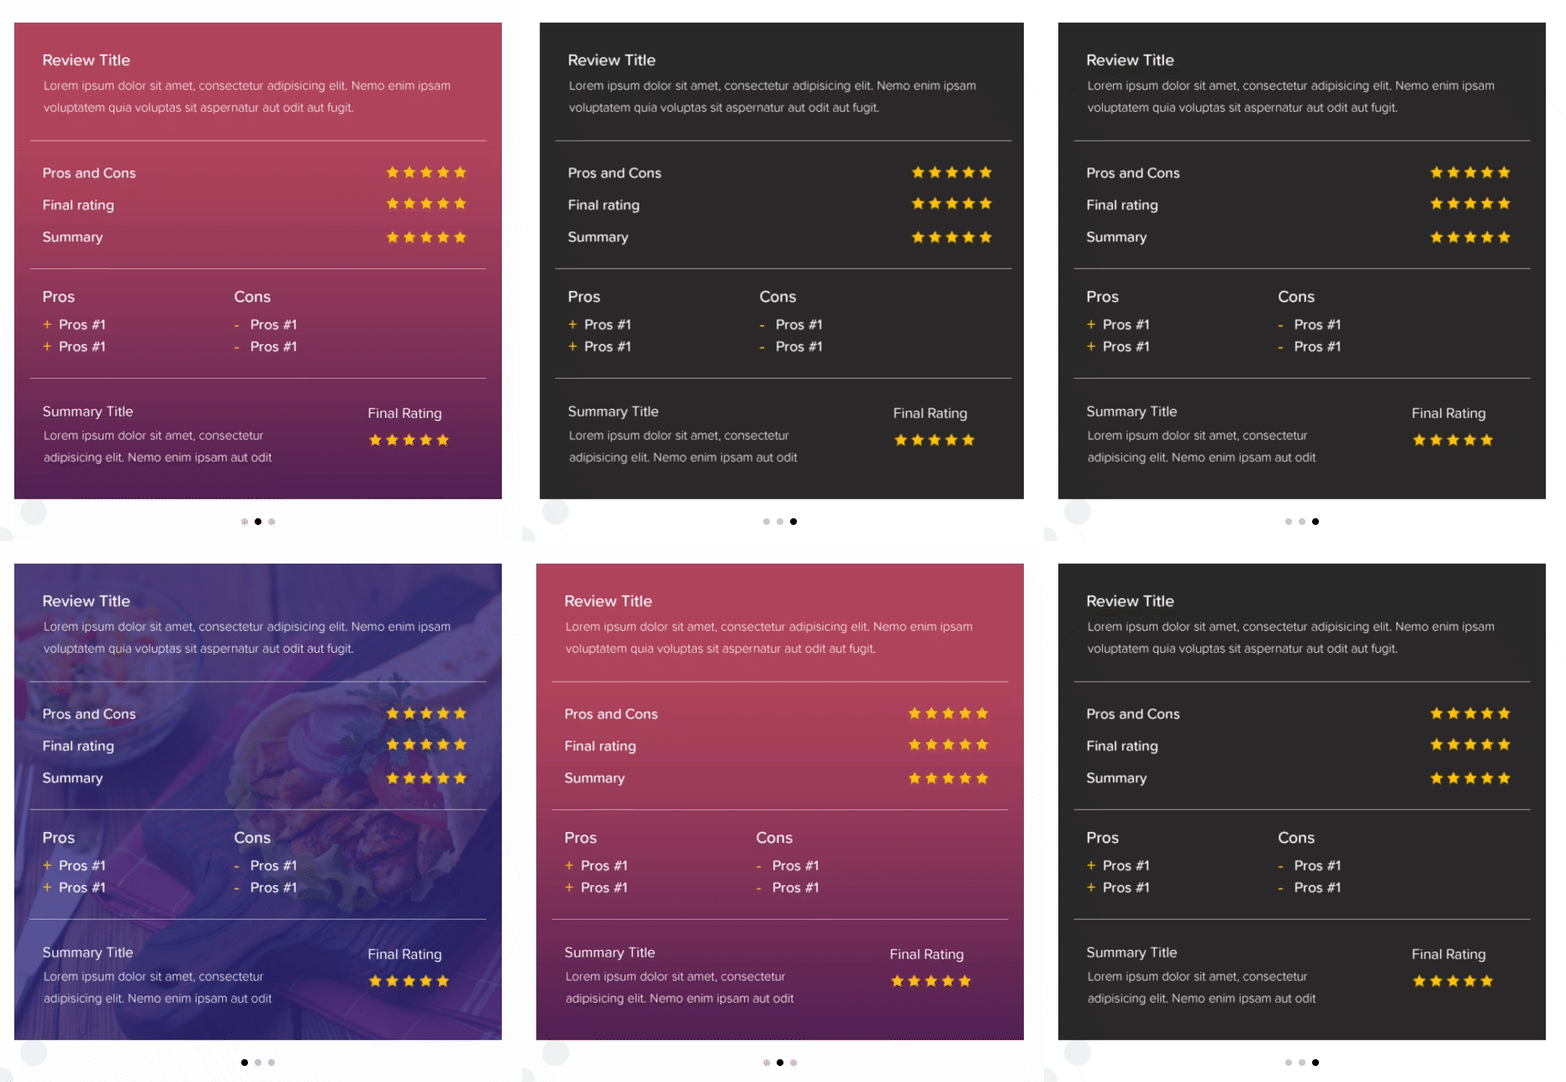
The simplest and easiest way to add a review section on WordPress sites is by using the Elementor and PowerPack Elements.
PowerPack Elements is the best addon for Elementor. It comes with 80+ creative and powerful widgets that allow you to extend your Elementor functionality to the next level and help you build beautiful websites in record time.
Talking of a review section, PowerPack includes an impressive Review Box Widget that gives you complete flexibility to create a dedicated review box section to flaunt your product reviews beautifully.
Also, the widget provides several design style options. And without even writing a single line of code, it allows you to customize the review box in every aspect.
How to Display a Review Section on WordPress Site using Elementor
Let’s see how you can use the PowerPack Review Box Widget and Elementor to create a review section on WordPress.
Before starting, make sure you have installed activated Elementor and PowerPack Elements on your WordPress website.
Drag and Drop the PowerPack Review Box Widget
First, open the page in Elementor editor, and in the search bar, type Review Box and drag & drop the widget on the page.

Double-check for the “PP” sign on the top-right corner of the widget to make sure it’s a PowerPack element.
Add Content in the Review Box Widget
Navigate to the Content Tab of the Review Box Widget. In the Content Tab, you’ll find two subsections:
- Review Box
- Review Items
Review Box
In this section, you’ll get options to customize the content of the review box.
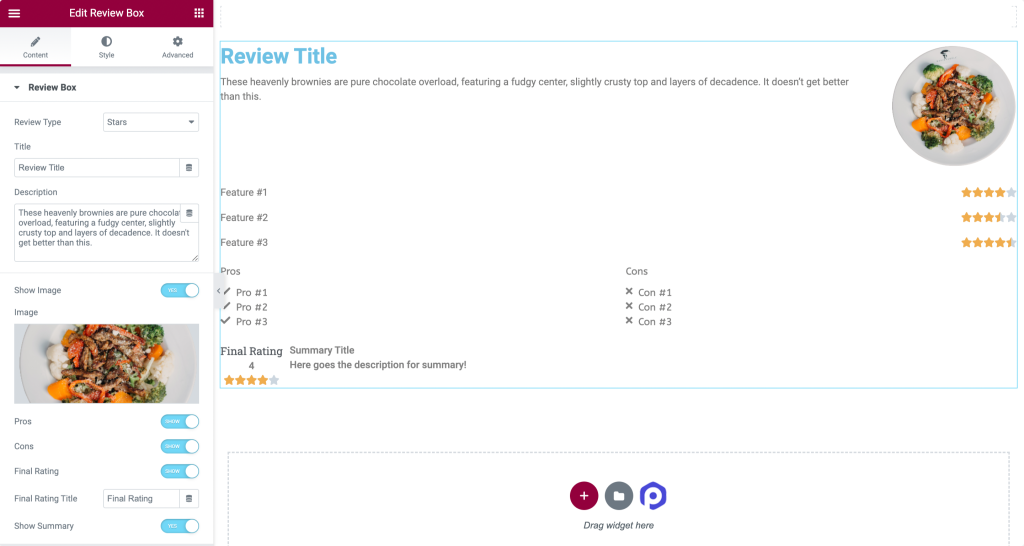
Let’s have a quick look at these options:
- Review Type: This option allows you to choose the review type among the three patterns available: Stars, Percent, & Number.
- Title: You can add a custom title to your review box from this option.
- Description: Here, you can provide your customers with a brief description of your product or service and its specialty. Remember, a brief short & sweet description looks more attractive because that’s easily readable and digestible.
- Show Image: By enabling this option, you can add a product image to it.
- Pros: This is an additional feature that PowerPack provides. Here you can add the pros of your product or service.
- Cons: Just like pros, you get the flexibility to add cons of your product along with the reviews.
- Final Rating: Enable the option to display a Final Rating to your Review Box.
- Final Rating Title: Once you enable the Final Rating feature, you can also customize the Final Rating Title as per your preference.
- Show Summary: In addition to these features, you can also style the ‘Review Box’ by adding a Summary into it.
These content options help you create a fully customized Review Box with Elementor.
Review Items
In this section, you’ll have options to add key features and customized ratings of your products, and based on the added features and ratings, your customers will choose the products.
Depending on your product type, you can add as many key features as you want.
Let’s see what it looks like after customizing the Content Tab.

Style Tab of the Review Box Widget
Let’s see how you can style each option available in the Review Box.
Navigate to the Style tab, and you will find a bunch of styling options.
Review Box
In this section, you’ll get multiple styling options to customize the look of your Review Box.
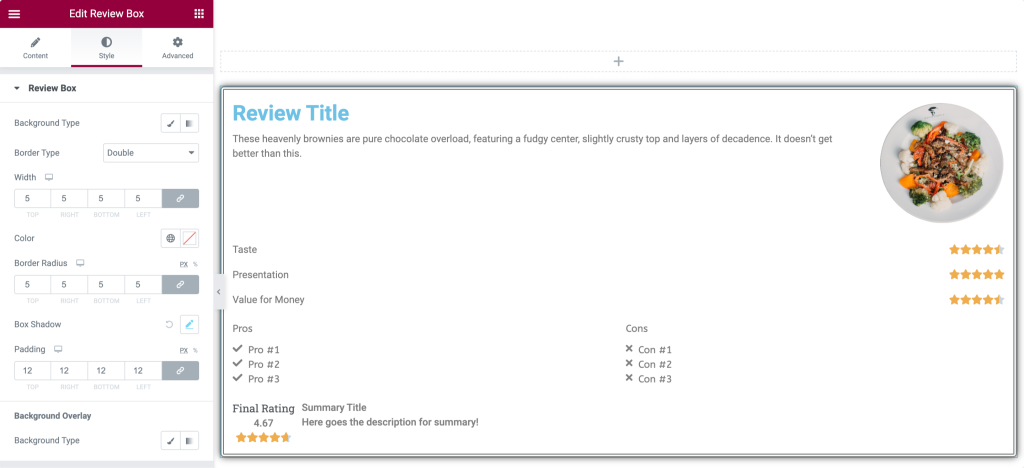
- Background Type: This option allows you to style the Review Box by adding a Classic or Gradient background. You can add an image or a solid color.
- Border Type: A border can be added to the Review Box here.
- Border Radius: Border Radius can be easily adjustable with this option.
- Box Shadow: It allows you to add shadow to your Review Box.
- Background Overlay: With this option, background opacity can be adjusted.
Title
In this section, you’ll get multiple options to style the Title of the Review Box. Let’s have a brief look at these features:
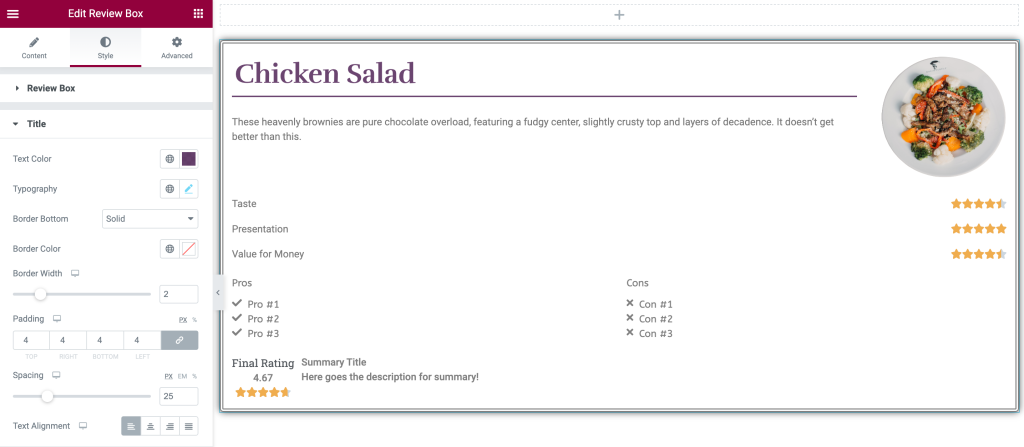
- Text Color: Title text color can be changed using this option.
- Typography: With this feature, you can alter the typography of the title text.
- Border Bottom: A border can be added to the bottom portion of the title text. Three types of Border patterns are available; Solid, Dashed, & Dotted.
- Border Color: From this option, you can add a border color.
- Border Width: Border Width can be adjusted here.
- Padding: You can adjust the padding from all edges of the Review Box.
- Spacing: It allows to add space between title and description.
- Text Alignment: Here, you can align the title text in the Review Box.
Description
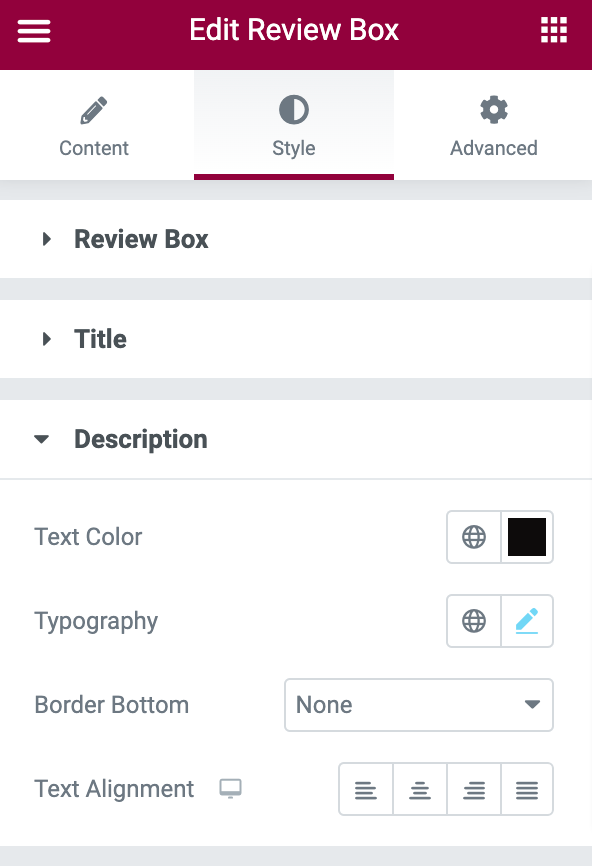
In the description section, there are many options to style and design the description. It offers text color, typography, border-bottom, and text alignment options.
Review Items
In this section, you’ll have plenty of additional options, including all the options we discussed in the title and description. In addition to the text styling options, you’ll have a border type option to highlight the key features.
This section includes plenty of additional features other than Text Color & Typography like Border Type, Border Width, Border Color, Padding, Items Spacing, and more.
Final Rating
In this section, the text & rating part can be configured separately like all the features available in the title and description section for styling. Here also, you can have many features like Align, Background Color, Typograpghy, etc.
Configure Advanced Tab of the Review Box Widget
Go to the Advanced Tab, and you’ll find all additional options available to customize and style the Review Box widget.
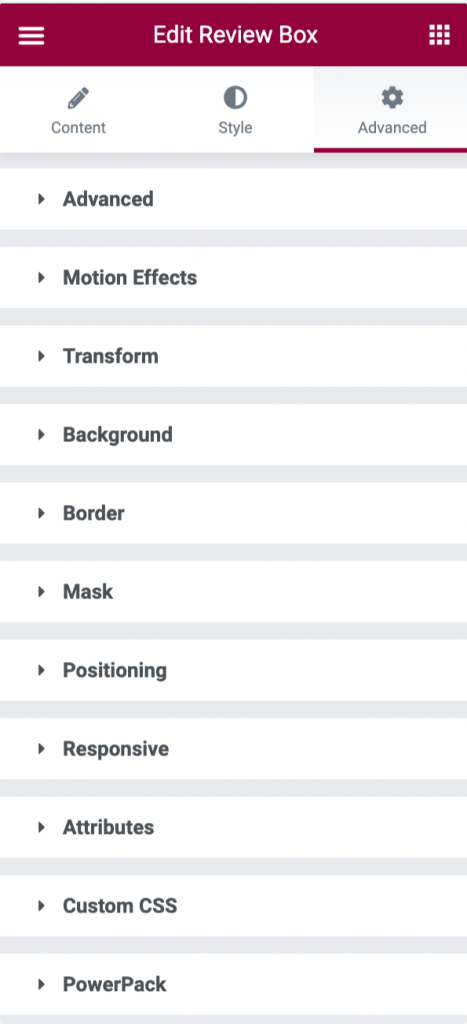
Let’s have a quick look and discuss these options in brief.
- Advanced: Advanced options like adjusting the margin and padding of the Review Box widget can be done in this section.
- Motion Effects: It allows you to customize the Review Box by enabling scrolling effects, mouse effects, sticky, and entrance animation.
- Transform: In this section, you can style and transform the Review Box widget by adjusting features like; Rotate, Offset, Scale, Skew, Flip Horizontal, and Flip Vertical.
- Background: This section lets you set the background type of the Review Box widget. Also, you can adjust the transition duration.
- Border: It’s easy to adjust the Review Box widget by styling its border. Also, the Review Box widget’s styling border type, radius, and border shadow can be done here.
- Mask: This option allows you to enable the mask option and easily customize its shape, size, position, and repetition.
- Positioning: The position & Width of the Review Box widget can be adjusted in this section.
- Responsive: In this section, the responsiveness of the Review Box widget can be adjusted. Whether to make it tremendously visible and adjustable in Mobile, Tablet, and Desktop.
- Attributes: In this section, an option to add some custom attributes to your Review Box widget is available.
- Custom CSS: It’s an additional option to add your own custom CSS easily.
- PowerPack: Here you’ll get more advanced PowerPack options like Display Conditions, Wrapper Link, and Custom Cursor.
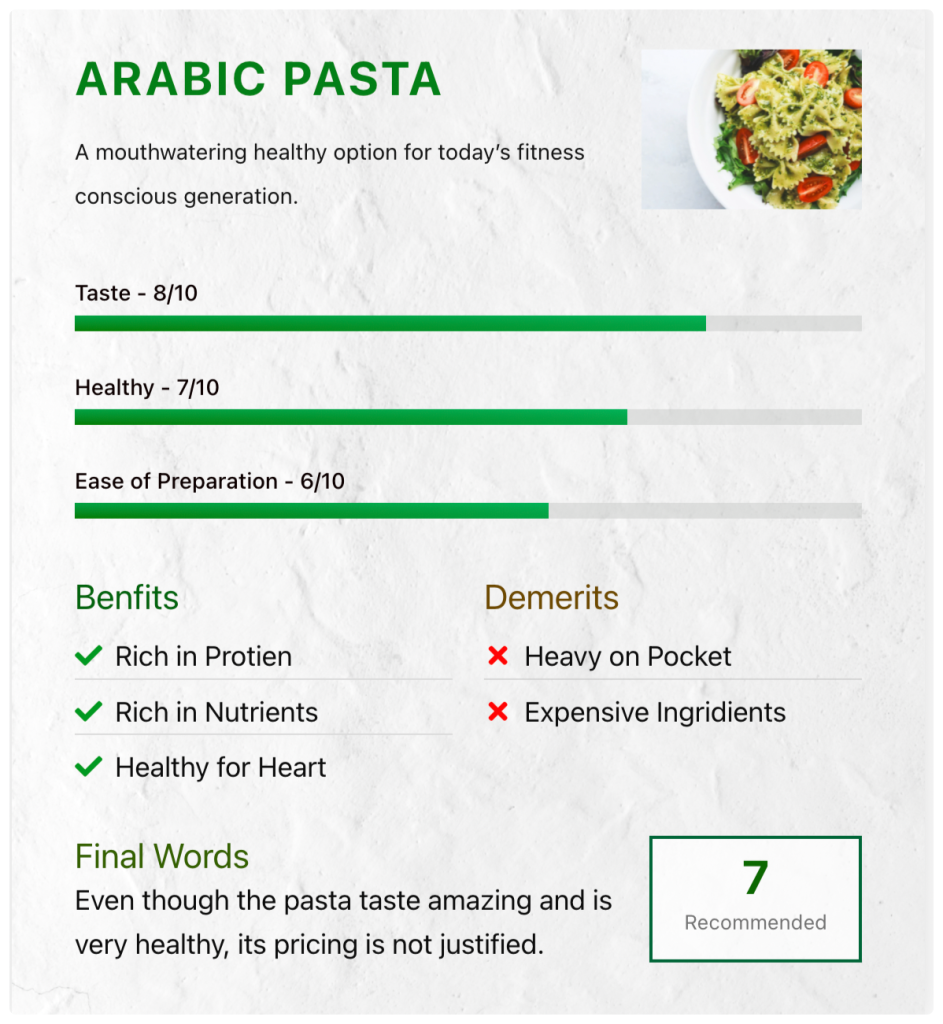
Let’s see the final look of your Review Box.
The final look of Review Box after styling & customizing it using the PowerPack Review Box Widget.
Get PowerPack Review Box Widget Now!
Adding positive reviews about your products or services will surplus your business credibility. Customers relate themselves to those reliable reviews and help you generate more sales for your business.
With PowerPack, you get more than 80 creative and handy widgets to create better and more beautiful WordPress websites using Elementor.
We hope this tutorial helps you create an interactive Review Box to display social proof of your service or product.
If you enjoyed using this element, we’re sure you’ll also love having our other PowerPack Widgets too. Because we understand your requirements, designing your website with PowerPack doesn’t require even a single coding word, and it’s just that simple, effective, and easy to use.
Click here to get a Review Box Widget for Elementor using PowerPack.
If you’ve reached here, we assume you’ve gone through our whole article, and you loved it too.
Please feel free to drop your comments here; we’d love to receive replies from you.
