
Creating long-form blog content is great for SEO, but it can also make your posts feel… well, long. Scrolling through a massive article without knowing where you are or how much is left can be frustrating for readers. That’s where a Table of Contents (TOC) comes in handy.
A table of contents (TOC) acts like a map, helping readers quickly find what they need, jump to a section, and gain a better sense of your content structure. Plus, it can boost your SEO by enabling rich snippets in search results.
If you’re using Elementor to design your site and blog posts, adding a Table of Contents is super simple, especially when you use the PowerPack Addons plugin.
In this guide, we will show you how to add a table of contents to your blog post in Elementor without adding any HTML code or CSS.
Why You Should Add a Table of Contents
Before jumping into the how-to, let’s quickly talk about why a TOC is a smart addition to your blog posts.
- Improves User Experience: Readers can instantly jump to the section that interests them.
- Boosts SEO: Search engines often display TOC links as sitelinks, which can improve click-through rates.
- Encourages Longer Engagement: By giving users control over navigation, you keep them on the page longer.
- Reduces Bounce Rate: Visitors don’t feel overwhelmed by long content when they can skim it easily.
Now let’s get into how you can add a fully-functional and stylish TOC in Elementor.
How to Add a Table of Contents to Your Blog Posts in Elementor
Step 1: Install PowerPack Addons for Elementor
Before we proceed, make sure you’ve installed and activated PowerPack Addons for Elementor on your website. To learn more check out our guide on how to install and activate PowerPack Addons Pro.
Step 2: Enable the Table of Contents Widget
Once the plugin is active, it’s a good idea to make sure the TOC widget is actually enabled.
To do this, go to Elementor >> PowerPack >> Elements in your WordPress dashboard. From there, look for the “Table of Contents” widget and make sure the toggle next to it is switched on (blue).

Now you’re ready to use it in Elementor.
Step 3: Create a Single Post Template in Elementor
To apply the Table of Contents consistently across all your blog posts, it’s best to add it inside a Single Post Template.
Here’s how:
- Go to Templates >> Add New.
- From the dropdown menu, choose Single Post.
- Give your template a name, such as “Blog Layout” or “Post Template,” and then click “Create Template“.
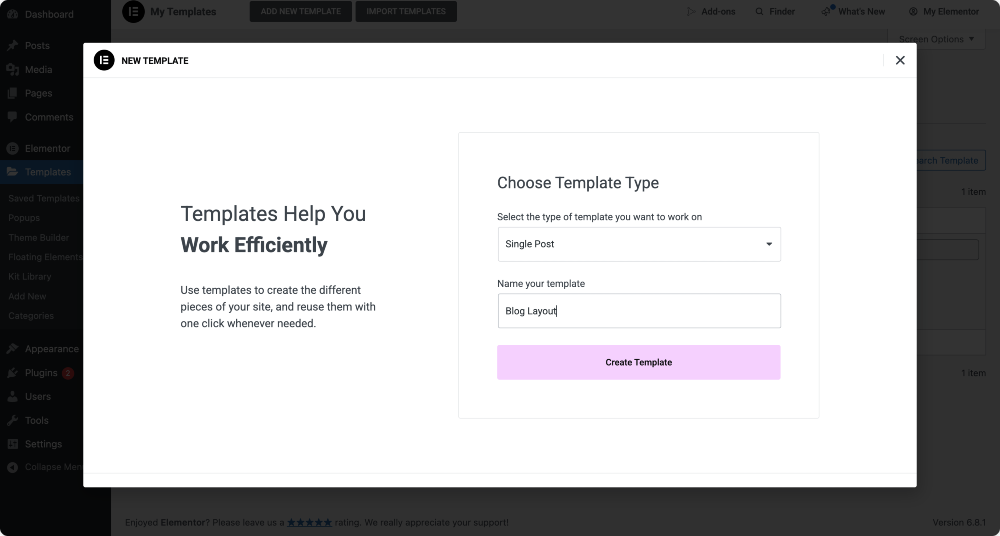
Elementor will now ask if you’d like to start from a blank canvas or use a pre-built layout.
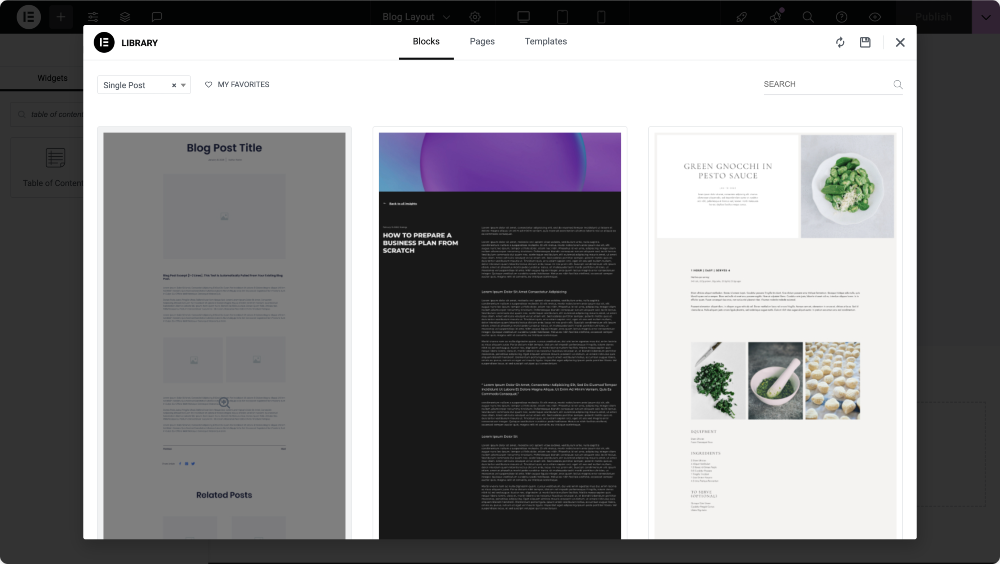
Step 4: Use a Pre-Designed Post Template (Optional)
If you don’t want to build the layout from scratch, Elementor makes it easy to insert a ready-made template. Choose one of the pre-designed options; it will typically include essential elements such as the post title, featured image, author box, and post content.
You can always modify these later to suit your blog’s design better.
Step 5: Add the Table of Contents Widget to Your Template
Next, we need to add the Table of Contents widget.
In the Elementor panel, search for “table of contents”. When the widget appears (look for the PP icon in the corner), drag and drop it into your layout.
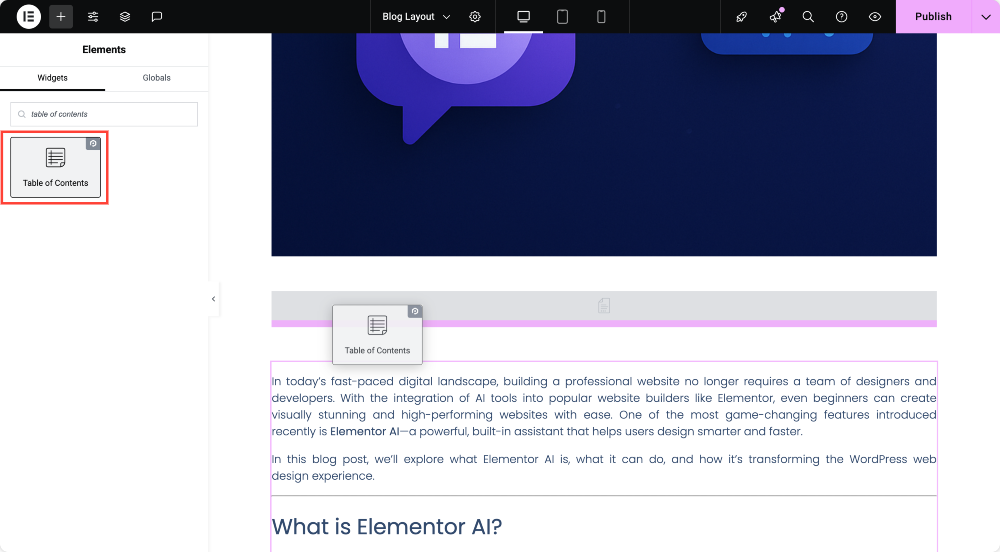
A common spot to place the Table of Contents (TOC) is right below the post title or featured image, but you can place it wherever it makes sense for your content.
Once you add the widget, it will automatically detect and display all headings (such as H2s and H3s) from your post.
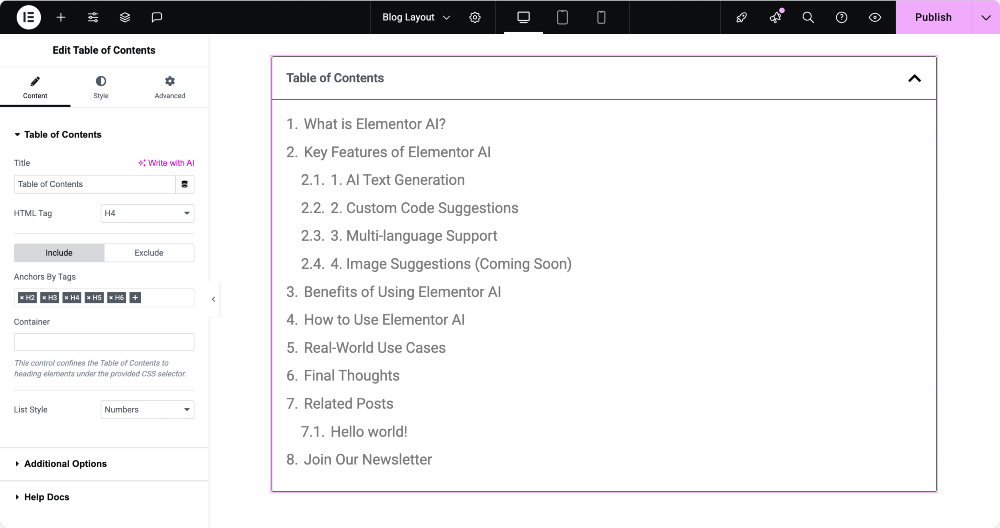
Step 6: Customize the Content Settings
With the widget on the page, you’ll see a list of all the headings from your post content. Now, let’s personalize the Table of Contents.
In the Content tab, you’ll find several settings:
You can change the title of the table of contents (TOC) to something like “Quick Navigation” or “On This Page.” If you’re thinking about SEO and accessibility, you can also adjust the HTML tag of the title and set it as H2 or H3, depending on how it fits in your hierarchy.
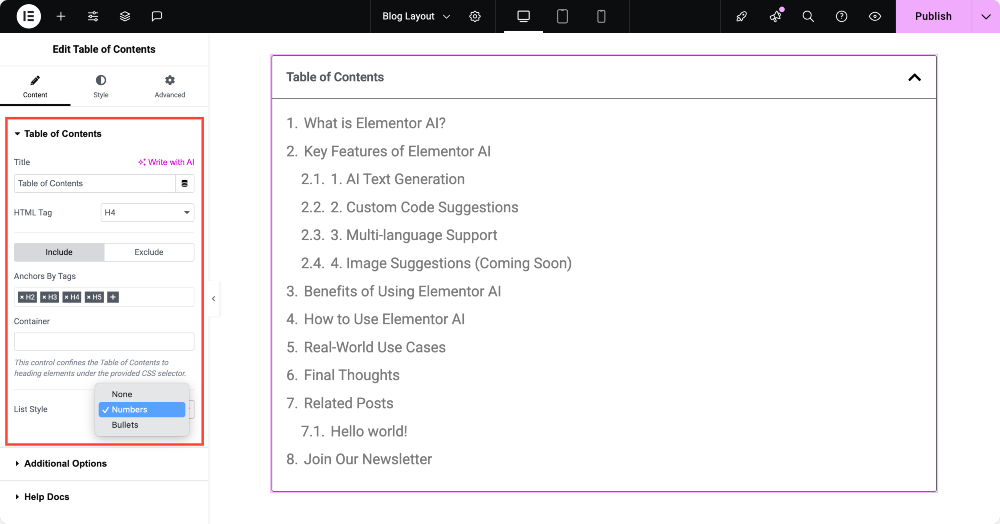
Then, there are settings to include or exclude certain heading levels. For example, you should only show H2s and H3s and skip H4s and below. And you can choose the list style, go with numbers for a structured, step-by-step feel, or bullets for a more minimal look.
Step 7: Explore Extra Features (Optional but Useful)
The PowerPack Table of Contents widget comes packed with features that help enhance both usability and design.
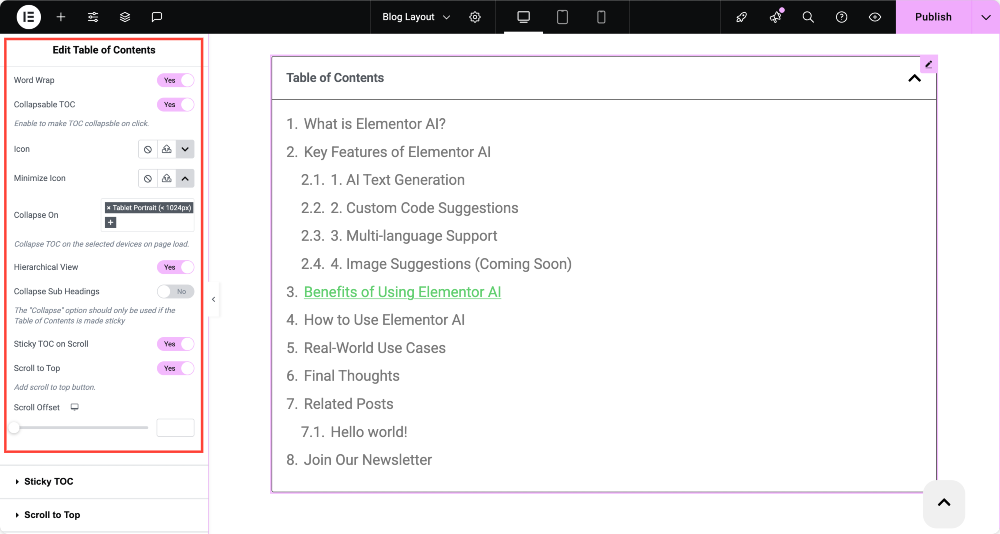
You can make the table of contents (TOC) collapsible, which is great for mobile users or when you want to keep the layout clean. Add an icon for expand/collapse, and specify when the widget should collapse on mobile, tablet, desktop, or all devices.
There’s also a hierarchical view option. This shows the relationship between H2s, H3s, and H4s by indenting sub-headings under their parent headings. If you have a detailed post, creating a table of contents (TOC) makes it more organized and easier to scan.
For longer posts, enabling Sticky TOC on Scroll is super helpful. It keeps the TOC visible as users scroll so that they can jump between sections at any time. You can even add a Scroll to Top button right within the widget to help users quickly return to the beginning of your post.
If you have a sticky header on your site, consider adjusting the Scroll Offset so that the headings aren’t hidden behind it when a user clicks a TOC link.
Step 8: Style the TOC to Match Your Site
Now that the functionality is set up, let’s make sure the widget looks great. In the Style tab, you’ll find a full suite of customization options:
- Box Styling: You can adjust the TOC’s background color, border type, and border radius and even add a box shadow to make it stand out. If you’re going for a clean layout, a subtle border and light background work beautifully.
- Header Styling: Want to customize the TOC title? You can set the text alignment, change the padding, and tweak colors, typography, and icons. You can even add a separator line and customize its width and color.
- List Styling: This is where you customize the actual TOC items the section links. Adjust the padding, change the text and heading typography, choose indentation for subheadings, and personalize the marker style (such as bullet color and size).
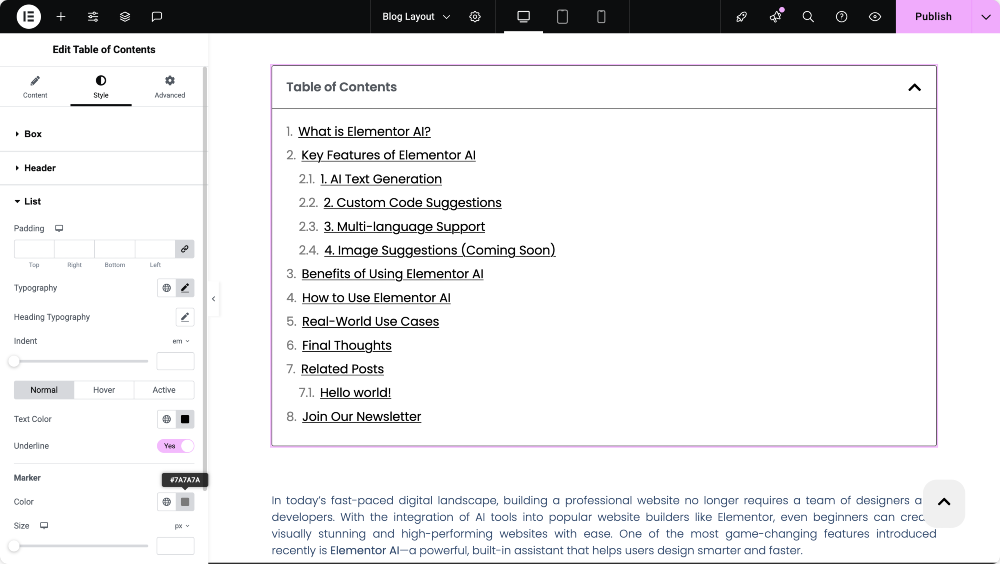
With these styling options, you can make the TOC feel like a natural extension of your website instead of something that was just dropped in.
Step 9: Publish and Set Conditions
Once everything looks the way you want, go ahead and hit Publish. Elementor will then ask you where to display this template.
Choose the condition ‘Include >> All Posts’ so that the template (and the TOC inside it) is applied to every blog post on your site.
Click Save & Close, and you’re done!

Key Highlights of the PowerPack Table of Contents Widget
The PowerPack Table of Contents widget is packed with useful features that not only enhance the reading experience but also provide you with complete control over how your Table of Contents appears and functions on your website.
Easily Customize the Table Title
You can personalize the title of your Table of Contents to fit your post’s tone or purpose better. Whether you want to name it “Quick Navigation,” “Contents,” or “Jump to Section,” the PowerPack TOC widget lets you update it in just a few clicks.
Include or Exclude Headings
One of the standout features of this widget is the flexibility it gives you when it comes to managing heading levels. You can choose which heading tags (H1, H2, H3, etc.) should appear in the TOC. Even better, using the built-in CSS selector functionality, you can specifically include or exclude particular sections or headings from your table, giving you complete control over what appears.
Choose Your Preferred List Style
Want to present your content in a clean, minimalist list or go for a more structured, numbered format? You’ve got options. The widget allows you to set your list style to ‘none,’ ‘bullets,’ or ‘numbers,’ depending on your design preference.
Long Headings? No Problem
If your headings tend to be lengthy, don’t worry. You can enable the Word Wrap option to ensure the text breaks neatly and your table of contents (TOC) remains clean and aligned.
Collapse the TOC Based on Device Type
You can choose to collapse the table of contents by default, depending on the device type: mobile, tablet, or desktop. This helps keep things tidy on smaller screens. Additionally, you can enable a hierarchical view, allowing nested headings (such as H3s under H2s) to be clearly indented and structured.
Sticky Table of Contents for Long Posts
For long-form content, having a table of contents (TOC) that scrolls with the user is a game changer. The Sticky TOC feature allows the contents list to stay visible as site visitors scroll down the page. This makes it easy for them to jump between sections at any time without having to scroll back to the top.
Best Practices for Using Table of Contents in Blog Posts
To make the most of your TOC, keep these tips in mind:
- Use proper heading structure: Start with H2s for main sections, followed by H3s and H4s as needed. Avoid skipping levels, such as going from H2 to H4, as this can confuse both readers and the Table of Contents (TOC) itself.
- Keep your headings clear and concise: Remember, your readers will use these to navigate your post. Keep the table of contents (TOC) short and collapsible. Especially for mobile users, enabling collapse can keep your layout clean.
- Preview on all devices: Ensure your table of contents (TOC) appears correctly and functions properly on desktops, tablets, and mobile phones.
Frequently Asked Questions
Ques. Can I hide the table of contents (TOC) on mobile devices?
Ans. Yes, you can use the “Collapse On” setting to make the TOC minimized by default on mobile or tablet.
Ques. Will it auto-update when I add new sections to my post?
Ans. Yes! The widget dynamically pulls heading tags from your content, so it updates automatically.
Ques. Can I use this widget outside blog posts?
Ans. Absolutely. You can add it to any Elementor layout page, custom post type, or even product description, as long as there are heading tags to pick up.
Wrapping Up!
A Table of Contents isn’t just a design feature; it’s a usability upgrade that can improve your readers’ experience, boost SEO, and make your content more engaging.
With Elementor and PowerPack Addons, adding and customizing a table of contents (TOC) is surprisingly easy. You get full control over how it looks and behaves, all without writing a single line of code.
You can do a lot more with the PowerPack Addons for Elementor. There are more than 70 creative widgets that you can use to customize your Elementor pages. If you wish to learn more about the PowerPack Addons for Elementor, check here.
