Auto-load and exit-intent pop-up techniques have been used a lot to display offers or as lead magnets. However, these pop-up techniques are also considered a bit annoying and less user-friendly. A better way of creating pop-ups is a 2-step pop-up or on-click pop-up.
Have you ever seen a popup that comes up when you click on a button or link? Well, that is what we call a 2-step pop-up or an on-click pop-up. This popup usually has the CTA of the website and needs you to perform an action that can be anything like entering your contact information or signing up for the Newsletter.
Why a 2-Step Pop-Up Works?
Recently, 2-step popups have gained a lot of popularity over popups that open directly unalarmed. There are a few very strong reasons why on-click or 2-step popups work. We prefer 2-step popups over anything, and here is the reason why.
- They don’t annoy the user – One of the biggest challenges with Pop-ups is that you cannot predict at what point they start to annoy the user. But when it comes to 2-step pop-ups, they are not forced on the users; they only come up when the users click on a link or button. So, this eliminates the part where it becomes annoying, as it opens up when the user is expecting it to show up.
- Have a better conversion rate – 2-step pop-ups work on the psychology of the Foot-in-the-door technique. Ever heard of that before? Well, let me break it down for you. This four-word ridiculously hyphenated technique aims to get a person to agree to a more minor request before requesting them to agree to a bigger one. Makes sense? So, when the user clicks on the button or the link to open the popup, chances are, they are more likely to complete the form and not abandon it instead (which is not something we want).
What Does an On-Click or 2-Step Pop-Up Look Like?
In short, they are regular pop-ups, but they only show up when the user clicks on a link or a button. The demo below should explain it to you pretty easily. Click on the button in the banner below to see the two-step pop-up in action.
Hi There!
I am a 2 step Popup.
Click the button below to see me in action.
Pretty simple, right?
Let’s see how you can make this popup without touching a single line of code with the Elementor Plugin and the PowerPack addon.
How To Create a 2-Step Pop-Up With Elementor?
Well, (saying the obvious) we will require Elementor and the PowerPack addon for Elementor installed and activated on your website before we continue.
Step 1: Creating a New Template for 2-Step Pop-Up Box
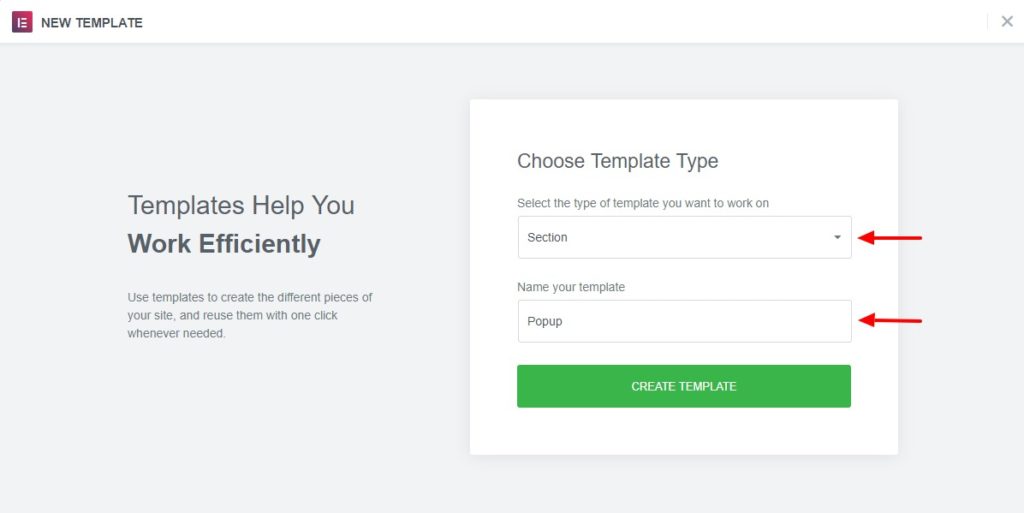
Before we add the popup to the website, we need to design it first. To do this, go to Elementor templates and then click on the Add New button. Choose the template type “Section” and give your template a proper name. Then, click on the Create Template button.

Step 2: Designing the Pop-Up Box
We will be designing a popup box which will have a button that will redirect the users to PowerPack’s Facebook page. This will have a simple layout with an icon on top with some text below it and finally the button that redirects the users to our Facebook page.
You can design the popup according to your website theme. If you want, you can take inspiration from our Popup box demo page and learn about different designs there. Once you have made all the changes, you can go ahead and publish the template.
This is what my popup box looks like after publishing:
Looks pretty neat, right?
Step 3: Adding the Pop-Up on Page Using Pop-Up Box Widget
Now, it is time we add the Popup box to our page. Go to the page you want to display your 2 step popup box on and then open it with Elementor editor.
Now from the PowerPack widgets, add the Pop-up Box widget by simply dragging and dropping it on the page. You can add this anywhere as we will be linking the popup box with the CSS class later on so this widget won’t even be displayed. Just throw it in anywhere you want.
Go to Content >> Settings and change the trigger to “Other“. Copy the CSS class in the field or you can enter your custom CSS class as well. Note down the one you enter there.

You can make other changes to the popup box as well from the content and style settings of the same.
Step 4: Connecting the Pop-Up Box Widget With the Trigger
Since we have chosen Other as the trigger, we can make the popup open with any link or button we want. Choose on what click you want to make your popup to show and do this.
If you are going with a button, open the button settings, and under the Content tab, enter the CSS Class you have copied earlier starting with a “#” sign. It will look something like this:

If you want to link the popup box with a text link, then copy this text below and change the bold text and add the CSS Class after the “#” sign –
<a href="#" class = "your-saved-class"> Your Link Text </a>
Once you do that click on the Publish button to make the changes live. You can view the page and it will work flawlessly.
What Next?
Since we have linked the popup box with the link, you can go ahead and add the class to other parts of the same page! With this you will not require adding the popup box widget multiple times on the same page.
Also Watch : How to Create Exit Intent Pop Up Modal Box with Elementor
So, what do you think of the 2-step pop-up box widget of PowerPack addon for Elementor?
Let me know in the comments what you think, and if you found this tutorial useful, please share it!


1 thought on “How To Create a 2-Step Pop-Up With Elementor? [Easy Guide]”
Hello,
is it possible to have a two step pop up for the newslwetter suscribe and send the info in both pop ups?
I want to use this to filter the neewsletters by interests