Are you looking for a simple way to create a navigation menu with Elementor? You have landed on the right page.
Menus are one of the most important elements of any website. For easy navigation and a better user interface, it is necessary to have a proper functional navigation menu on your website.
A boring and dull-looking navigation menu can distract your visitors and make them leave your website instantly. Creating an attractive and beautiful menu is a cumbersome task, even for a professional designer.
Today we’ll see how you can create attractive yet intuitive navigation menus on your WordPress website using Elementor and PowerPack Advanced Menu Widget.
PowerPack Advanced Menu Widget is loaded with multiple customization options that let you create advanced menus on your website. You get complete control over each styling property and can design every aspect of your navigation menu without adding any custom CSS and code.
Let’s see how we can create a custom navigation menu with an Advanced Menu widget for Elementor.
To use the PowerPack Advanced Menu widget, we first need to create a native WordPress menu.
So, let’s begin with creating a menu in WordPress.
Creating a Navigation Menu in WordPress
To add a menu in WordPress. Go to your WordPress dashboard and click on Appearance > Menus.
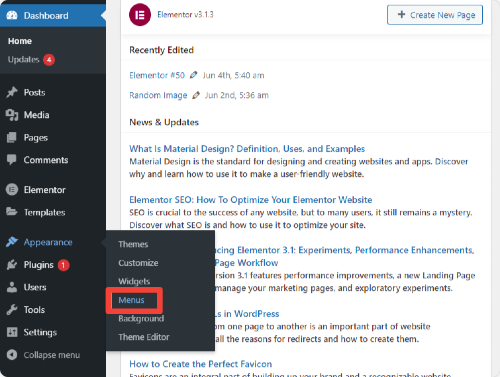
Either you can select from the pre-built menus or create a new one. To create a new menu. Click on create a new menu.
Now give a proper name to your menu and add menu items from the page’s left side. You can choose from pages, posts, custom links, and categories. Select the items as per your performance and click on the “Create Menu button.”
Now that you are done with creating the navigation menu with WordPress, now we will see how you can customize and style this menu using PowerPack Advanced Menu Widget.
PowerPack Advanced Menu Widget for Elementor
Using WordPress, you can create navigation menus, but it has some drawbacks when it comes to advanced customizations and styling properties.
We need to use the PowerPack Advanced Menu Widget to overcome these drawbacks. Let’s first take a look at some key features of the PowerPack Menu Widget for Elementor:
Features of Advanced Menu Widget
- Full Screen & Off-Canvas Layout
- Horizontal & Vertical Menu Layout
- Alignment & Spacing Option
- Pointer Styles & Animations
- Link Hover Effect
- Extensive Styling options
- Mobile Responsive
Now we will proceed with the customizing and styling part.
Before we proceed, make sure you have installed and activated Elementor and the PowerPack Elementor Addon on your website.
Create a Beautiful Navigation Menu with Elementor & PowerPack
Add Advanced Menu Widget
You can add PowerPack Advanced Menu anywhere on your website, on any page, and even within the posts also.
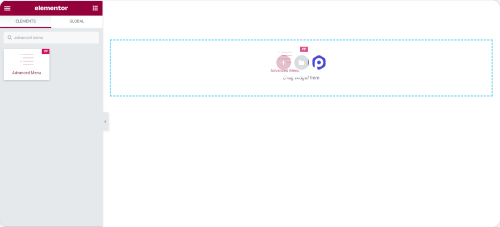
To display the navigation menu on the page, first, go to your WordPress dashboard and click Pages. Now select the page where you want to add an advanced menu widget and edit the page with Elementor.
Once you are in the editor, search for “Advanced Menu” in the widgets area. Now drag and drop the Menu Widget on the page.
Make sure to check the PP icon in the upper right corner of the Advanced Menu Widget.
Once you add an advanced menu widget to your page, we can customize it as per our preferences.
Customizations in the Content Tab of the Advanced Menu Widget
Like any other Elementor widget, Advanced Menu also consists of three tabs: Content, Style, and Advanced.
Let’s see the customization options of the Content Tab.
Menu: From here, you can choose the menu that you want to display on your page.
Layout: With the PowerPack Advanced Menu widget, you can set your navigation menu’s layout to be Horizontal or Vertical.
Alignment: Easily set the alignment of your navigation menu. Place it Left, Center, or Right of your page.
Pointers & Animations: Hover animation is important for interactive behavior. In the Advanced Menu Widget, you get multiple pointer styles & animations that you can use to create interactive navigation menus. Choose from any of these styles and add different effects for hover in just a few clicks.
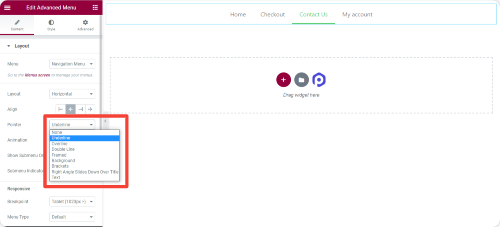
Sub-Menu Indicator: Choose an indicator for your sub-menu from the available options.
Create Completely Mobile Responsive Elementor Menus
In the era of advanced designing, it is important to have a website that looks good on every screen type, from desktop to mobile. Using PowerPack Advanced Menu Widget, you can create fully-functional menus that look perfect and are easy to navigate on small-screen devices.
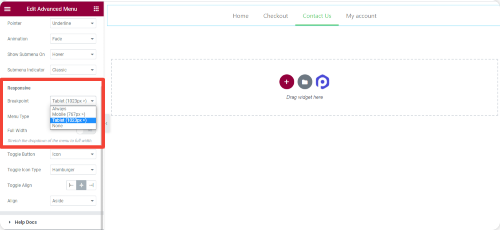
You can customize menu styling depending on each device type. It gives you complete flexibility to set a custom breakpoint, adjust it to the full width, and select an icon for toggle actions.
Also Read: How to Create a 2-Step Pop-Up With Elementor?
Create Elementor Off-Canvas Menus
One of the advantages of using the PowerPack Advanced Menu Widget is that you can easily create Off-Canvas Menu without adding an extra plugin to your website.
Let’s see how you can create an Off-Canvas menu using the PowerPack Advanced menu Addon for Elementor:
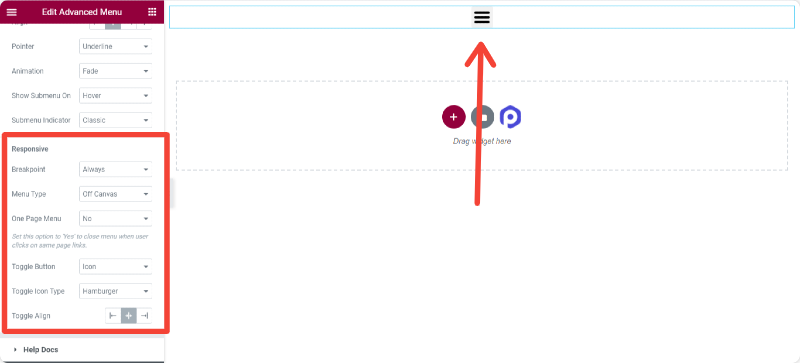
To display the Off-Canvas menu, we need to change the breakpoint from the content tab.
Set breakpoints to “Always” under the responsive section and select the menu type as “Off-Canvas:”
Now you’ll see a Hamburger icon on your page center.
You can either display Icon, Icon+Label, or only Label for your toggle button. If you want to add any other icon type rather than the Hamburger icon, you can easily do that too.
Lastly, you can change the alignment of the toggle button Left, Right, and Center as per your preference.
Create Elementor Full-Screen Menus
Want to display full-screen menus on your elementor websites? Worry not! You can also design a full-screen menu using PowerPack Advanced Menu Widget.
To display full-screen menus:
Under the responsive tab, set a breakpoint as “Always” and choose the menu type as “Full-Screen,” and done!
You can easily customize content tab options as per your preference. Now we’ll see styling options for the Advanced Menu Widget.
Customizations in the Style Tab of the Advanced Menu Widget
Once you have made changes in the Content Tab, you can proceed to the Style Tab for more customization options.
Using the PowerPack Advanced Menu widget’s styling options, you can create some outstanding navigation menus on your website. Advanced menu widget includes all advanced styling options that will allow you to build pixel-perfect menu designs.
Let’s see some of the styling options you get with the Advanced Menu Widget:
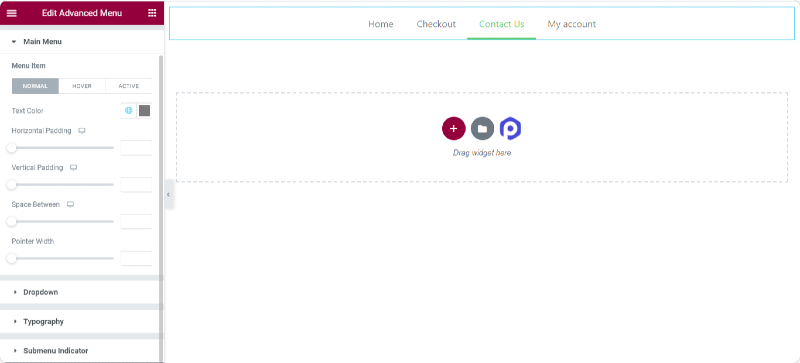
For Main Menu Elements
- Text color customization option for Normal, Hover, and Active Menu Elements.
- Control over Horizontal and Vertical Padding
- Flexibility to set space b/w menu items
- Define pointer widget as per your choice.
- Complete Typography Customization
For Sub-Menu Elements
Highlight your sub-menu elements with the advanced Menu Widget. Usually, people ignore the styling of sub-menu elements because of the hectic process. But not now! With the Advanced Menu widget, you get plenty of advanced customization options to style sub-menu elements.
- Text color customization option for Normal, Hover, and Active sub-menu elements.
- Flexibility to set background color for Normal, Hover, and Active sub-menu elements.
- Option to add a border, border radius, and box shadow.
- Add a separator/ divider style.
- Complete Typography Customization
Get Advanced Menu for Elementor Now!
PowerPack Advanced Menu Widget is loaded with numerous customization options. You can easily create fully-functional navigation menus without adding any code.
With PowerPack Elementor Addon, you get more than 60 creatively designed Elementor widgets. Click here to get the Advanced Menu Widget with PowerPack!
You might also be interested in learning how to create a table on a WordPress website easily using Elementor.
If you liked this article, share your thoughts in the comments below. For more PowerPack tutorials, please subscribe to our YouTube Channel.

2 thoughts on “How to Create a Navigation Menu with Elementor”
There is no option for Submenu background…
Hi Deyan
The widget has many options to style the submenu including the background color option. If you have purchased the plugin then you can submit a support ticket for any kind of help.