
Looking for a simple way to create photo albums with Elementor?
If you have a lot of photos on your website, simply throwing them all on one page can look messy. That’s where photo albums come to the rescue. Instead of one giant pile of pictures, you can neatly group them into albums. This way, your visitors can click, explore, and enjoy your photos in an organized and visually appealing manner.
Now, Elementor is amazing for designing websites, but it doesn’t come with a ready-to-use photo album widget. Don’t worry, that’s where the PowerPack Album Widget steps in. This widget makes it easy to create stunning, responsive photo albums with just a few clicks. You can group images into categories, add titles and descriptions, and design layouts that match your website’s style.
In this guide, I’ll walk you through the exact steps to create photo albums in Elementor using the PowerPack Album widget. And by the end of the post, you’ll be able to build a professional-looking photo showcase that’s easy to manage and looks great on all devices.
Why Add Photo Albums to Your Website?
Adding photo albums isn’t just about looks; it’s about creating a better experience for your visitors. Here’s why they matter:
- Better organization: Instead of cluttering a page with hundreds of images, albums let you group photos neatly. Visitors can easily find what they’re interested in.
- Professional appearance: Albums give your website a polished, modern look that builds trust and credibility.
- More engagement: When photos are well-organized, users spend more time browsing through them. This increases engagement and can even improve conversions.
Photo albums are useful for many types of websites. For example:
- Photographers can separate albums for weddings, portraits, and events.
- Designers can create project-based albums to showcase their portfolio.
- Event planners can display albums for different events they’ve managed.
- Travel bloggers can organize photos by trip or destination.
- E-commerce websites can showcase product collections or brand stories.
What You’ll Need to Create Photo Albums in Elementor
Before we start building, here’s what you’ll need:
- Elementor: The Album widget works with both the free and Pro versions of Elementor.
- PowerPack Addons for Elementor: This plugin includes the Album widget we’ll be using.
- A WordPress site with images ready to upload: Organize your photos beforehand so it’s easier to build your albums.
How to Create Photo Albums With Elementor
Now, let’s take a closer look at what this widget can do, and then I’ll show you, step by step, how to create your first photo album.
About the PowerPack Album Widget
Album widget from PowerPack Addons lets you create stylish albums where your photos don’t just sit, they stand out. You can add multiple images to a single album and display them on any page of your site.
Some cool things you can do with this widget include:
- Add a cover image for your album so visitors are tempted to click and explore.
- Highlight your album with a title, subtitle, icon, or even a button so people know what it’s about.
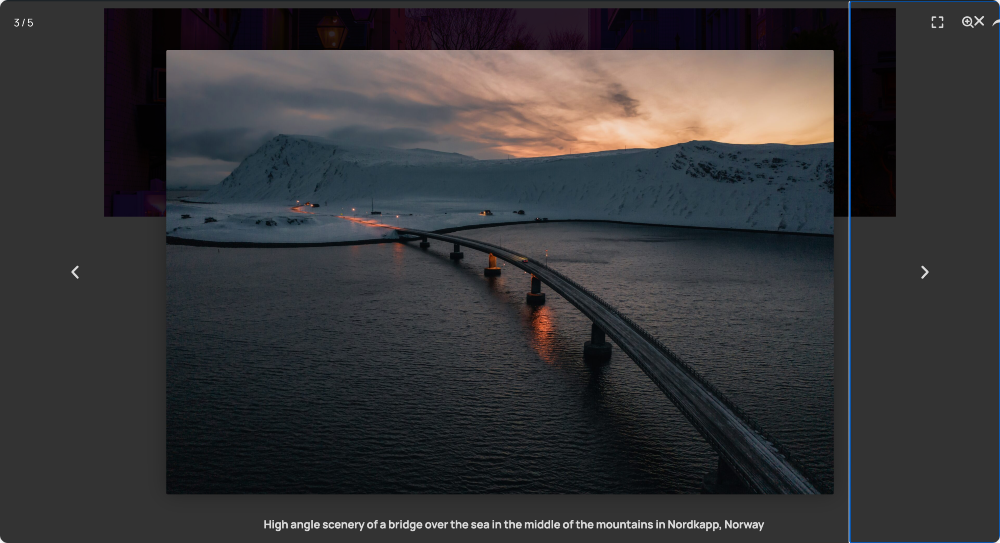
- Enjoy lightbox customization, which is just a fancy way of saying you can control how your photos pop up when someone clicks them. You can add arrows, slide counters, keyboard navigation, thumbnails, and even fun animations.
- If you don’t want a big cover image, you can trigger the album with a simple button. This is perfect for when you have limited space on the page but still want your photos to be available.
- Style it your way with tons of options for colors, typography, spacing, borders, and more.
So basically, this widget is like giving your photos their own stylish home.
Step 1: Install and Activate PowerPack Addons
First things first, you need to install and activate the PowerPack Addons plugin on your website.
Step 2: Open Your Page in Elementor
Open the page where you’d like your photo album to display. You can create a new page or edit an existing one. Once ready, click Edit with Elementor to open the visual editor.
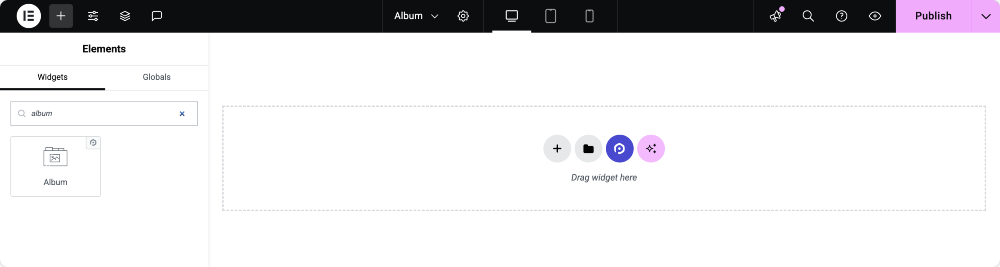
Step 3: Drag and Drop the Album Widget
In the Elementor editor, search for “album” in the widget panel. Look for the widget with the PP icon (that stands for PowerPack). Drag it onto your page where you want your album to show up.
Step 4: Customize the Album Widget Content
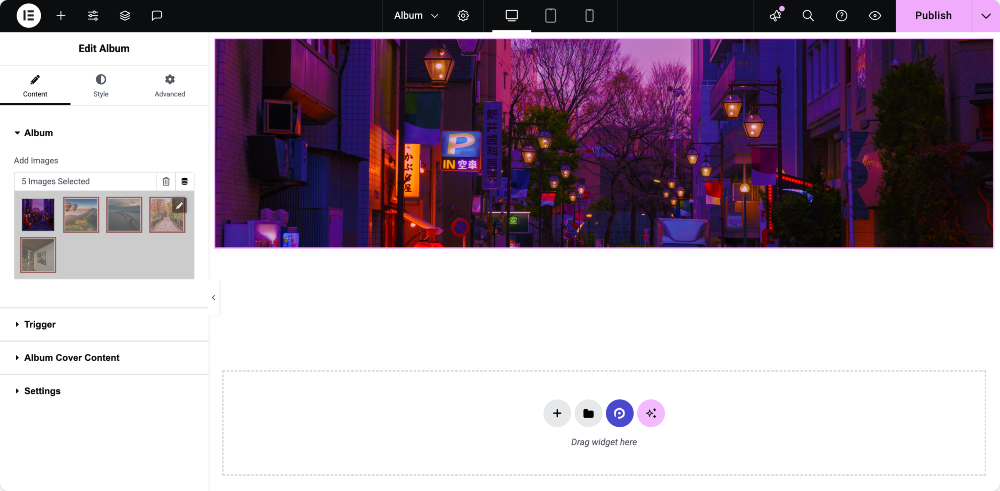
Now comes the customization part. The Album widget gives you four main sections under the Content tab:
Album
This is where you add your photos. Simply click the “+” icon and choose your images. By default, the first image you upload will appear as your cover photo; however, you can change it later.
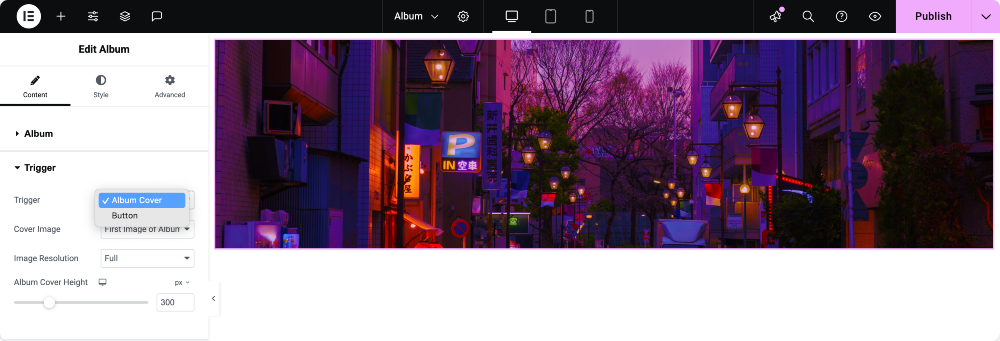
Trigger
Here you decide how visitors will open the album.
- You can use the Album Cover itself or a Button.
- If you opt for the cover, you can choose a custom image or use the first photo from your album as the cover.
- You can also adjust settings such as resolution and cover height.
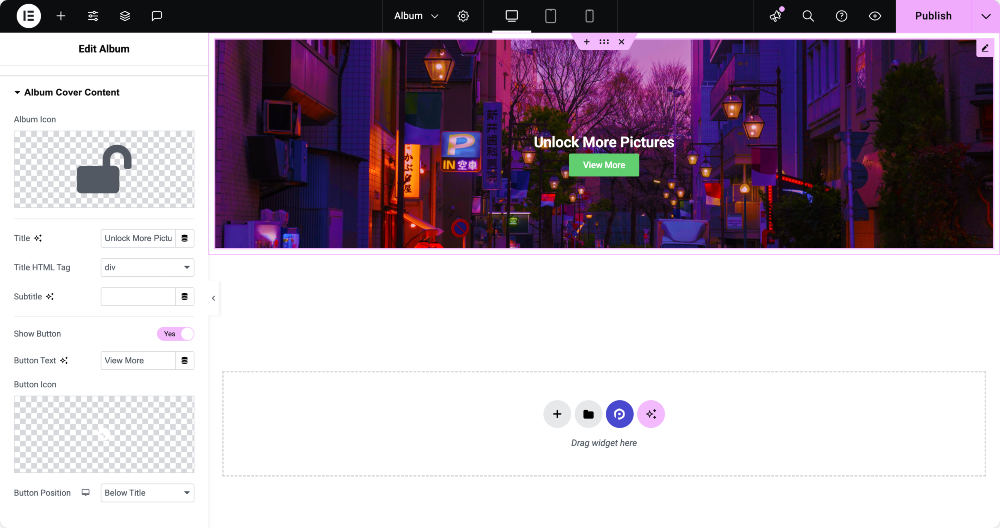
Album Cover Content
Want to add more details to the cover? This is where you can add an icon, title, subtitle, or even a button with custom text. It helps guide your visitors and makes the album look more professional.
Settings
This is all about the lightbox, which is the popup that opens when someone clicks your album.
- You can choose between Elementor’s default lightbox or the Fancybox option.
- If you go with Fancybox, you’ll unlock more controls, like adding arrows for navigation, showing slide counters, enabling keyboard navigation, displaying thumbnails, and even picking transition effects.

Step 5: Style Your Album
Once the content is in place, switch over to the Style tab. This is where you can play with colors, fonts, spacing, borders, and more.
Step 6: Preview and Publish
When everything appears to be in order, preview your album. Test it on desktop, tablet, and mobile to make sure it looks good everywhere. If you’re happy with the result, hit Publish.
Congratulations, you’ve just created your first photo album with Elementor!
Wrapping Up!
With the PowerPack Album widget, you can build beautiful, functional albums in just a few steps. From cover images and titles to customizable lightbox effects, you have full control over how your photos are displayed.
So what are you waiting for? Install PowerPack Addons, giving your photos the attention they deserve. Your visitors will love browsing through them, and you’ll appreciate the professional look of your site.
Frequently Asked Questions
Yes, you can! The PowerPack Album widget works with both Elementor Free and Pro. You just need the Pro version of PowerPack Addons to access this widget.
Absolutely. The Album widget is fully responsive, which means your photos will adjust beautifully on desktops, tablets, and smartphones.
Yes, you can organize your photos into different albums, each with its own cover image, title, and description. This makes it easy for visitors to browse your content.
No, the widget is optimized for performance. As long as you use properly sized images, your site will remain fast and smooth.
Yes. If you don’t want to use a cover image, you can trigger your album with a simple button. This is a great option for pages with limited space.
The Album widget gives you complete control over the lightbox. You can enable arrows, slide counters, thumbnails, and animations, making the viewing experience engaging and fun.
